Different Methods How to Transfer iTunes Playlist to Android
It is said that because of many rises of different music streaming services, iTunes is being left behind. iTunes is a media library service that was created by Apple Music Inc., which serves as a media player as well as a music manager to its device.
But because of continuous innovation, different companies focus to improve their services including online streaming which provides people greater access to music. Many also considered using Android phones nowadays.
Therefore, if you are thinking to transfer iTunes to Android, then don’t worry because we got you covered.
In this post, we will talk about, if it is possible to transfer iTunes playlists and ways how to transfer iTunes to Android. We will also give you an ultimate method so you can play your iTunes playlist on any device. Therefore, without further ado, Let’s get started!
Article Content Part 1. Can iTunes Playlists Be Transferred? Part 2. How to Transfer iTunes Playlist to Android?Part 3. Best Method to Transfer iTunes Playlist to Android Part 4. Summary
Part 1. Can iTunes Playlists Be Transferred?
For those who are curious if you can transfer iTunes playlist to Android, then the answer is Yes! It might sound impossible but there are various methods that you do so you can export your iTunes playlist.
Transferring the iTunes playlist can be a great help to Apple users especially if they have already built a collection of music, that they don’t want to download or purchase on other music services, as well as if they consider using other devices other than iDevices.
However, there isn’t any direct way to transfer iTunes playlist to Android since the iTunes app is exclusive only within the Apple ecosystem. That’s why we still need to do some extra effort to we can make our iTunes playlist to be accessible on your Android device which we will tackle in detail in the next section.
Part 2. How to Transfer iTunes Playlist to Android?
There are many ways how you can transfer your iTunes playlist to Android. In this part, we will talk about three solutions that will allow you to play your iTunes music on an Android device.
Solution 1. Transfer iTunes Playlist to Android via USB
First, we will discuss how we can transfer iTunes playlist to Android manually using USB. In this method, you will be needing a USB cable that can be attached to your device, iTunes, and PC with Windows OS (Note: This won’t work on Mac).
The process might be a little bit complicated because we have to extract the contents from the iTunes playlist, transfer them to a folder, and then transfer them again to the folder of your device. So, provide you with a detailed step, just follow the one I have given below.
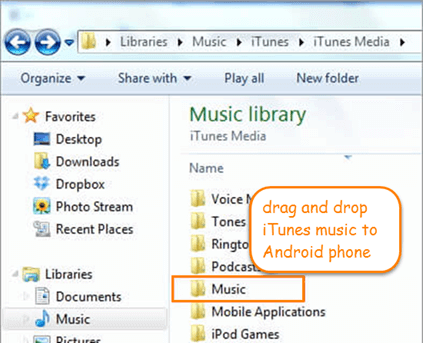
- Create a new folder on your desktop by clicking the right button of your mouse and selecting New Folder.
- Next, open your iTunes and go to your playlist. Then by using the drag and drop method, select the songs that you wanted and transfer them to the folder that you have created previously.
- Got This PC tab by opening a Windows Explorer. From there, you can select which Android device is connected to your computer. Allow your computer to make changes on your device when asked.
- Once you have allowed your PC to access your device, the main folder of your device will pop up. Select your Phone’s folder and locate your Music folder where we will import your iTunes playlist.
- Finally, just simply drag and drop the songs on your computer to the Music folder of your device. In this way, you have transferred the iTunes playlist to Android using USB.
Solution 2. Transfer iTunes Playlist to Android Using Apple Music
Another way to transfer iTunes playlist to Android is thru Apple Music. Unlike iTunes, the Apple Music app has an Android version which you can just download on the Playstore. Therefore, just by syncing your music collection on iTunes to your Apple Music app, you can easily access them on your Android device.
Just make sure that you are signed in the same Apple ID and you have to be currently subscribed to Apple Music. Below are the steps how to transfer the playlist to Android using Apple Music
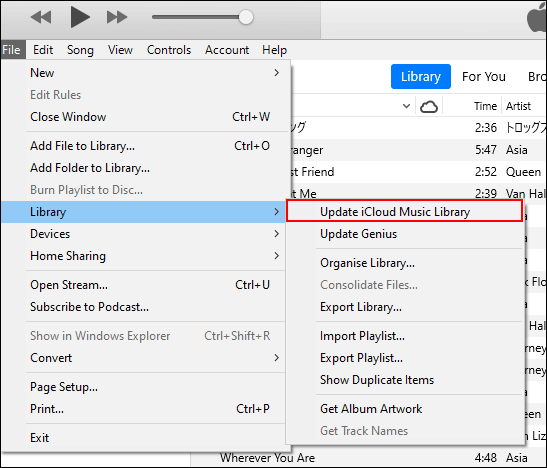
- Open iTunes on your computer, then click Edit, and select Preferences.
- On the iTunes preference’s General tab, see to it the “iCloud Music Library” is enabled, and confirm it by clicking the “OK” button.
- Wait until the entire library to be synced to your iCloud. It will take time for the process to be completed and iTunes doesn’t have a progress bar so just be patient until it is done.
- After your iTunes library has fully synced to your iCloud, launch the Apple Music app installed on your Android and tap on “Library” which you can find at the lower part of the screen. In the library, you will be able to view the iTunes playlist that you have synced earlier.
Solution 3. Sync iTunes Playlist with Google Play Music
Perhaps, most people think that you can’t sync iTunes to Google Play Music but this is also one of the methods that you can transfer iTunes playlist to Android. Here are the steps how to do so.
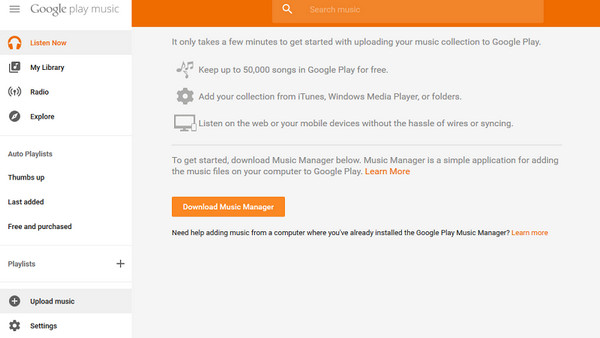
- Open the internet browser on your computer, then go to Google Play Music, and log in to your Google account.
- Then, locate the “Upload Music” that is on the upper right corner of your computer.
- Next, click the “Download Music Manager” and just simply follow the instruction that will be presented to you.
- Once your Google Play Music has been set, you can now direct the program on your iTunes library. Then, start uploading your iTunes playlist to Google play by clicking “Next”.
- Finally, log in to your Google account on your Android device, then you will see there the iTunes library that you have transferred.
However, this method only allows you to access the music online and cannot be stored on your local storage.
Part 3. Best Method to Transfer iTunes Playlist to Android
If you want to transfer iTunes playlist to Android without restrictions, then the best method that I could think of is by using a professional tool called TunesFun Apple Music Converter.
To give you an insight about TunesFun Apple Music Converter, it is a program that can download songs from iTunes and convert them to audio format like MP3, AAC, WAV, etc. that is compatible with your Android device.
The great advantage of this method is you are not required to subscribe to any music services and once you download the songs you can keep them forever. This tool is so powerful because it can remove the DRM protection on each song, making them no longer restricted once converted, and you can freely transfer them to any device.
Moreover, another feature that is worth mentioning is its ultra-quick conversion speed and even with such speed, it doesn’t affect the quality of the song as if it is still the original track. Apart from that, this software also has advanced ID3 technology that can instantly identify the song’s information as well as the artwork and metadata. This also helps to maintain your tracks organized even after conversion.
Therefore, if you haven’t installed TuneFun Apple Music Converter, you can download its installer by visiting its official website. Once you have it installed, I provided the steps below on how to transfer iTunes playlist to Android using this software.
How to convert iTunes Playlist using TunesFun Apple Music Converter
Step 1. Select the songs on your iTunes playlist
Open your installed TunesFun Apple Music Converter on your computer. It will instantly identify the songs from your iTunes and then select the songs that you wanted to convert.
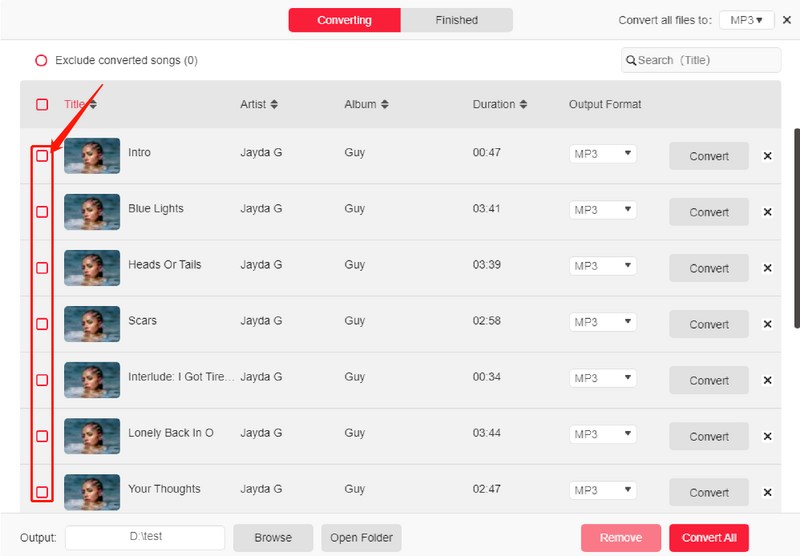
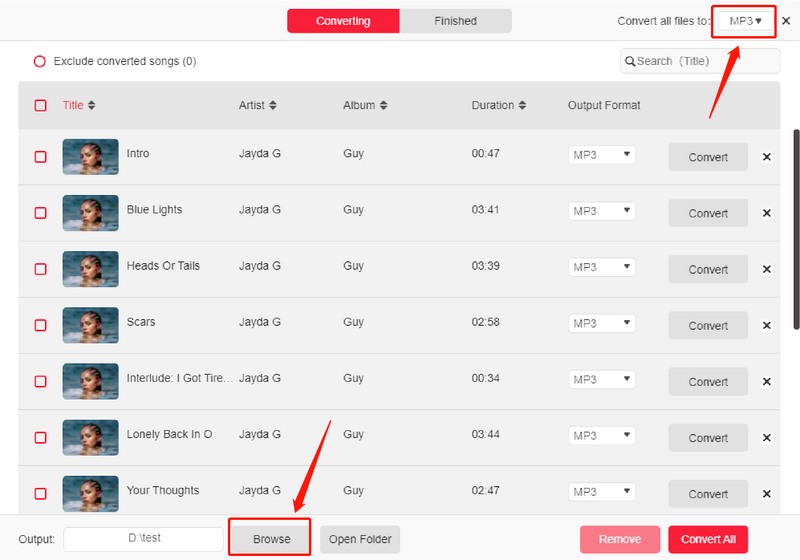
Step 2. Set the audio output format and the location folder
Once selecting the songs from iTunes, you can now set the output format accordingly, and you can also choose the file folder where you want to save your converted songs.
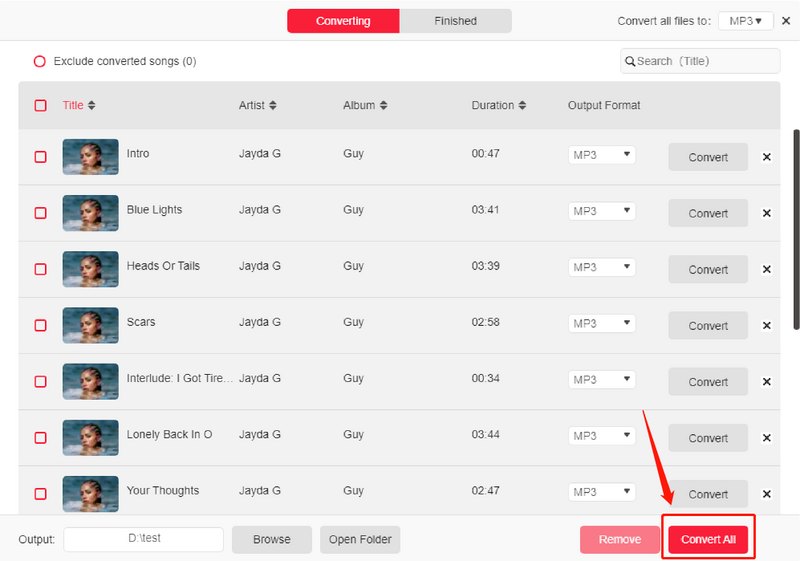
Step 3. Begin converting your iTunes music
After everything is all set, you can now start converting songs from your iTunes playlist by clicking the “Convert” button. The length of the conversion process will depend on the songs that you have selected. Once done, you can finally view the converted songs on the folder that you have set earlier.
The converted songs can be transferred to your Android device using your USB cable. What’s good about the output of this method is you can transfer and play them to any device without restriction and even offline.
Part 4. Summary
Perhaps the idea to transfer iTunes playlist to Android might be impossible but, in this post, we presented that there are various ways actually that you can apply.
However, if you would ask me, I would still recommend you to use TunesFun Apple Music Converter because first, it is easy to use, it doesn’t require you any paid subscription to access its services, it removes the DRM protection that is encrypted on your iTunes music tracks, and lastly, you can able to access the songs to any devices and can keep them forever.
 Home
Home
Leave a comment