Easy Tutorials of How to Sync iTunes to Android Devices
How to sync iTunes to Android? The iTunes app is truly a blessing for people who are into digital content. From being a media player to a file manager, one would be able to use the platform to its advantage. Storing digital files such as music is possible with iTunes.
However, if you have bunches that you’d like to move to devices such as your Android phones or tablets, a guide about how to sync iTunes to Android gadgets would then be needed!
It is a known fact that iTunes was created and developed by Apple Inc. Thus, if you are thinking of moving your iTunes files to your iOS device such as your iPhone, there would be no issue at all.
But looking at how to sync iTunes to Android gadgets is different, as people have a doubt that can they get Apple Music on Android. This is something we should further look into. Going into a few extra steps would be required to finally get your iTunes files accessible on your Android devices. Fortunately, there are always solutions available.
In this article, we will be addressing the topic of how to sync iTunes to Android gadgets seamlessly. There are, in fact, bunches of ways to do it. We will be tackling each of these methods one by one in detail so it would be handy for you!
What else are you waiting for? Let’s now begin!
Article Content Part 1: Manually Transferring iTunes to Android DevicesPart 2: How to Sync iTunes to Android Devices via Music Streaming PlatformsPart 3: Additional Tip: Downloading And Keeping iTunes And Apple Music Songs Forever AvailablePart 4: Summary
Part 1: Manually Transferring iTunes to Android Devices
We will be starting off with the basic methods of how to sync iTunes to Android gadgets that you can apply. In this instance, what you only need is your Windows File Explorer and everything should be all good. Just simply follow the below-detailed steps.
Step #1. You must first connect your Android mobile device to your computer via a USB cable.
Step #2. Once recognized, pop-up information shall be shown on your screen. From the list, you have to choose “Transfer files” or “MTP”.
Step #3. Via your Windows File Explorer, access your connected Android device, and head to the “Music” folder.
Step #4. On the other window tab, head over to your “iTunes music” folder.
Step #5. You just have to drag and drop the tracks that are in the “iTunes music” folder to your Android device’s music folder! Copying and pasting a folder shall work as well!
After doing the above, you shall then see that the music files that you brought from your iTunes account will now be available on your Android gadget. This is indeed an easy procedure of how to sync iTunes to Android gadgets!
Part 2: How to Sync iTunes to Android Devices via Music Streaming Platforms
It is also recommended that you take advantage of several music streaming platforms in order to accomplish the “how to sync iTunes to Android gadgets” process. We will be sharing some that you can use if you’d prefer to.
Google Play Music
What most people love about using Google Play Music is that it allows one to save up to 50,000 tracks without requiring any fee! Once you have successfully uploaded your iTunes music files to your Google Play Music, accessing them not only on Android but also on iOS or PC shall be easy to do.
Additionally, if you resort to using this, it will help you save some storage space on your Android gadget as you will be saving the tracks in the cloud. But this also means that when you listen to the songs, your device should be connected to an internet network. Well, this wouldn’t be an issue at all if you were always at home, right?
Now, let’s see how you’ll finally be able to get your iTunes Music files uploaded onto Google Play Music.
Step #1. On your web browser, head to the Google Play Store.
Step #3. Tap “Music”, and then the “My Music” menu before choosing the “Add Your Music” option.
Step #3. If you still do not have the browser extension installed, you will be asked to do the installation process.
Step #4. Go back to the Google Play Music page and then tap the “Add My Music” menu.
Step #5. You have to choose the “Select from your Computer” option and then go to your iTunes Media folder next.
Step #6. Start to choose which iTunes music files you’d like to save to Google Play Music from your iTunes library. To upload, just tap the “Open” option. Alternatively, dragging and dropping shall also work.
YouTube Music
In the process of how to sync iTunes to Android gadgets, you may also want to consider using YouTube Music. Syncing your iTunes library is definitely possible through this platform.
![]()
Most people would say that this is one of the easiest options when it comes to uploading bulk or a huge number of iTunes files. Compared to Google Play Music, you are capped at uploading 100,000 songs via this platform.
However, since the tracks shall be on the cloud, an internet connection is needed to access and listen to them. Downloading them locally is possible but take note that saving songs shall take up storage space.
If you wish to try using YouTube Music, below are the steps that you must follow.
Step #1. Head to YouTube and then log into your account.
Step #2. At the top right section of the page, hit your profile image.
Step #3. From the options that are shown, you have to choose the “Upload Music” menu.
Step #4. Look for the songs that you’d like to be synced to your Android device by going to your PC’s file explorer, choosing “Music”, then “iTunes”, “iTunes Media”, and then finally, “Music”. By default, the music files should be in this folder.
Step #5. Choose the iTunes music files that you’d like to upload to YouTube Music and then tap the “Open” menu.
Step #6. Wait for a few minutes until the songs are synced onto your YouTube Music library!
You may now start enjoying the tracks as you like via your Android gadget!
Apple Music
If you still prefer to use the Apple Ecosystem in the “how to sync iTunes to Android gadgets” process, then resorting to using Apple Music would be the best option for you.
Though the iTunes app isn’t supported by Android gadgets, you would be glad to know that Apple Music is! You just have to install it on your Android device through the Google Play Store. You shall be able to enjoy your Apple Music content just by logging into your account.
Though using Apple Music to access your iTunes music files on Android is definitely good, there would be a need to pay for the monthly subscription fee to continue.
Sadly, unlike Spotify, there is no free version of Apple Music that’s available to use. If that’s all good with you, let’s check below how streaming iTunes audio files on Android shall be possible through downloading Apple Music assistance.
Step #1. On your PC, launch the iTunes app.
Step #2. Tap the “Edit” button and then choose “Preferences” next.
Step #3. Under the “General” tab, the “iCloud Music Library” option must be enabled. Click “OK” afterward. This option won’t be seen if you have not subscribed to any Apple Music subscription plans. This is responsible for ensuring that files would be synced regardless of the device that’s being used.
Step #4. As mentioned initially, you must have the Apple Music app installed on your Android device which you can do just by heading to the Google Play Store.
Step #5. Using your Apple ID credentials, log into your Apple Music account. You shall notice that the iTunes music files shall now be ready for streaming.
Just in case you can’t seem to see your iTunes music files, you can try these troubleshooting guides.
- On both devices, you must be using the same Apple ID.
- The apps that are in use should be updated to the latest available versions.
- Try to also refresh your iCloud Music Library. To do so, go to iTunes. Tap the “File” menu, choose “Library”, and then hit the “Update iCloud Music Library” option.
Indeed, the use of music streaming platforms such as the ones presented in this section of the article is good enough in the “how to sync iTunes to Android gadgets” process. It would be your decision which one to select from these service providers. All of them should be good and helpful enough.
Part 3: Additional Tip: Downloading And Keeping iTunes And Apple Music Songs Forever Available
Reading the first two sections of this article should already answer the dilemma that you have when it comes to how to sync iTunes to Android gadgets. However, if you are looking at moving or syncing protected iTunes or Apple Music songs, that would be a separate matter to discuss.
Knowing that DRM protection hinders the files from being accessed on unauthorized devices should be something one must look into. If you are trying to move protected files, it will be a challenge to do it directly unless you get the protection removed first.
In this case, when handling DRM-encrypted iTunes and Apple Music songs, the best way to do so is to employ the use of professional tools such as the TunesFun Apple Music Converter.
With the help of this software app, you can easily bypass the files’ protection and get rid of it with just a few taps! Additionally, there are even more benefits that can be offered by this tool.
- You can process the conversion of iTunes and Apple Music songs to flexible formats like MP3 using this professional software app, TunesFun Apple Music Converter.
- You can even do audiobook conversion(in case you are also fond of listening to audiobooks).
- The app does lossless conversion with a 16x conversion rate. Thus, you can be sure that the resulting files shall have almost the same original quality. All the ID tags and details shall be preserved as well.
- You can install the TunesFun Apple Music Converter on your Windows and Mac computers. Thus, the installation isn’t a problem at all.
- Using the TunesFun Apple Music Converter would be so easy as its UI is too simple alongside its navigation keys and functions.
Let’s then see how you can ace the conversion of protected iTunes and Apple Music tracks through the TunesFun Apple Music Converter!
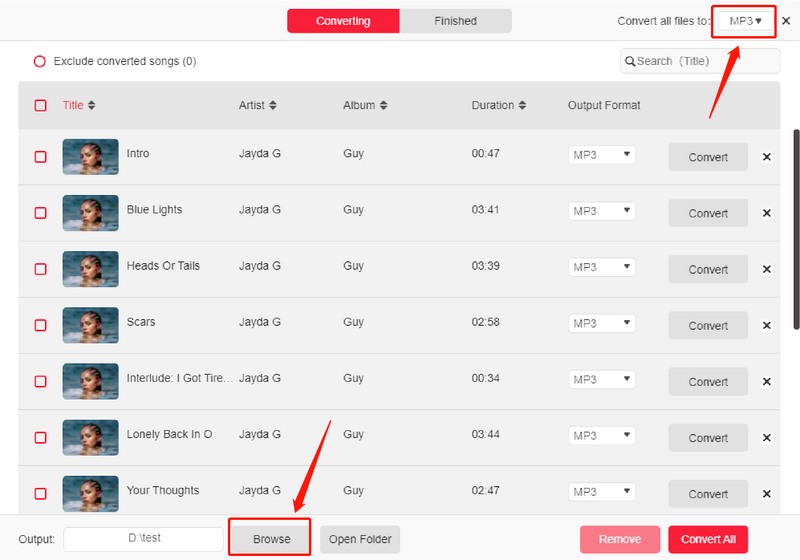
Step #1. Install the TunesFun Apple Music Converter on your computer. On the main page, previewing and selecting the tracks to be processed must be done.
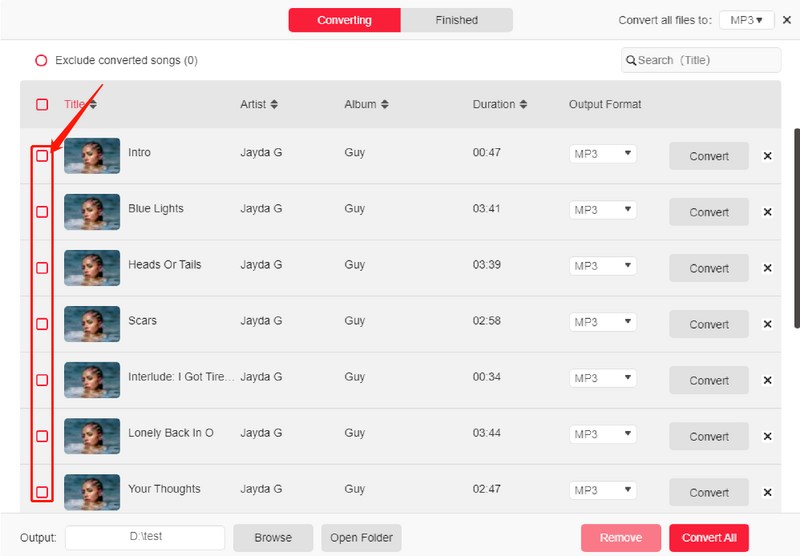
Step #2. Select which output format you’d like to use. At the bottom of the page, the output parameter options are available and can be changed as preferred.
Step #3. Hit the “Convert” menu to let the app start the transformation of the chosen tracks. While this is being done by the app, the removal of the songs’ DRM protection shall also happen at the same time.
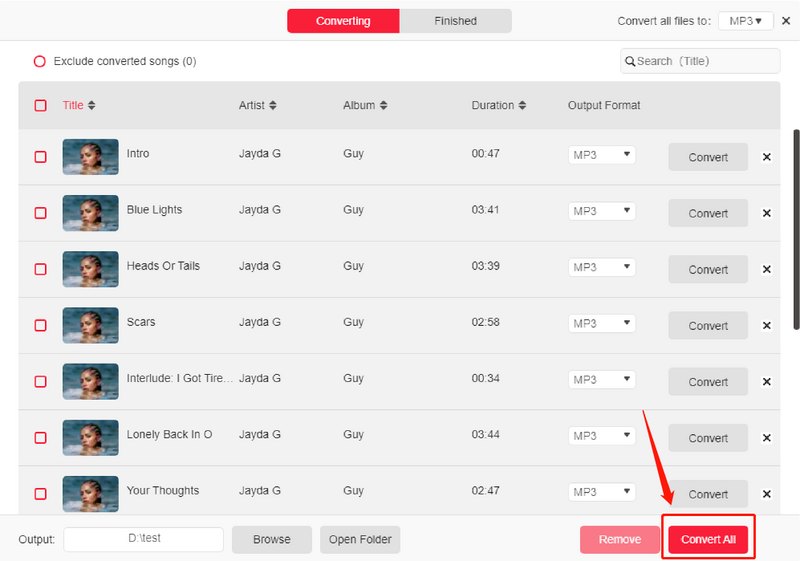
In no time, the converted tracks that should now be free from protection will be available on your PC for streaming. Moving these tracks or saving them on any device that you have should be fine. It is helpful for you to use TunesFun Apple Music Convert to address how to sync iTunes to Android.
Part 4: Summary
The process of how to sync iTunes to Android gadgets is easily solvable either by manually doing the transfer or through the help of other music streaming platforms like Apple Music, Google Play Music, or YouTube Music.
However, when dealing with protected tracks, to avoid encountering issues, the removal of their protection must be done first through the help of apps like the TunesFun Apple Music Converter.
 Home
Home
Leave a comment