How to Turn off “Highlight” on Kindle
Are you someone who easily gets annoyed and distracted just by seeing things you think you don’t need or won’t benefit you that much? Well, if you are, seeing “popular highlights” on Kindle would not be good then! But don’t worry! In this post, we’ll teach you the process of “Kindle – remove highlights”.
“On Kindle, to remove highlights, what process should I follow?”
Kindle is popular, especially for those who love to both read and listen to digital items. On Kindle, bunches of collections can be stored, saved, and explored by every user. Of course, it is loved by many because of the various features and functions that it offers.
The "popular highlights" feature on Kindle is a noticeable and intriguing aspect, especially for new users. As you read, you'll encounter underlined texts, indicating passages that have been highlighted by over 10 other readers of the same e-book.
While some find this feature helpful, others might consider it annoying. For those seeking a guide on how to remove highlights on Kindle, below are the common problems associated with this feature.
- When seeing highlighted texts, one’s immersion in the content of the e-book will break. If you’re so interested in the book, the thrill could be gone upon seeing the highlights.
- Seeing highlighted passages could also hinder you from thinking and interpreting the content independently. Additionally, what others see as important could not be as important to you.
If you are one of the many who would want to know more about the process of “Kindle – remove highlights”, then reading this post’s content will surely be beneficial. We will be teaching you the detailed process depending on the device you’ll use.
Article Content Part 1: Turn Off the “Popular Highlights” Feature on Kindle e-Ink Devices & Fire TabletsPart 2: Turn Off the “Popular Highlights” Feature on Windows and Mac ComputersPart 3: Turn Off the “Popular Highlights” Feature on Android and iOS DevicesPart 4: Added Information for Audible Audiobooks EnthusiastsPart 5: Summary
Part 1: Turn Off the “Popular Highlights” Feature on Kindle e-Ink Devices & Fire Tablets
In this part, we will be sharing with you the detailed “Kindle – remove highlights” process if you are using Kindle e-Ink devices or Fire tablets.
On Kindle e-Ink Devices
Kindle Paperwhite, Kindle Oasis, and Kindle Voyage are some of the Kindle e-Ink devices. In case you are using these, then you just have to follow the below steps for the “Kindle – remove highlights” process.
For the Touchable Kindle Devices
Step #1. On the home screen, look for the “three-dot” icon at the top corner and press it. From the options listed, choose “Settings”.
Step #2. Tap the “Reading Options” menu next.
Step #3. Choose “Highlights & About This Book” next.
Step #4. Look for the “Popular Highlights” menu and have it turned off.
For the Non-Touchable Kindle Devices
Step #1. On the home screen, hit the “menu” options and then press “Settings” from there.
Step #2. Head to the third page to look for “Popular Highlights”. You’ll see a “turn off” option alongside it. Just simply tap this menu.
On Kindle Fire
Step #1. From the top of the Kindle Fire tablet, swipe down and look for “Settings”. Choose “Applications” next.
Step #2. Just scroll down until you see the “Reading settings” option. Tap it once seen.
Step #3. Look for the “Popular Highlights” option. There is a slider next to it. Just toggle this off to finally get this feature disabled on your Kindle Fire tablet.
In the next part, you will learn the “Kindle – remove highlights” process if you are to use your Windows or Mac computer.
Part 2: Turn Off the “Popular Highlights” Feature on Windows and Mac Computers
If you are using Kindle on your computer, we’ve got here the detailed guides relative to the “Kindle – remove highlights” process. Check out the steps that you have to complete.
On Windows PC
Step #1. Launch Kindle on your Windows PC. At the top menu bar, look for “Tools” and then tap it. From the drop-down list that would show, select “Options”.
Step #2. Head over to “Annotations” next. Look for the “Popular Highlights” menu. The checkbox next to it must be unchecked. Doing so shall let you finally disable the “Popular Highlights” feature on Kindle!
On Mac PC
Step #1. Launch Kindle on your Mac. At the top menu bar, simply tap “Kindle” and once the drop-down list showed up, choose “Preferences”.
Step #2. There should be a new window that would pop up on your screen. Click the “Annotations” menu. Uncheck the box next to the “Enable Popular Highlights” that you’ll see.
And, that’s it! That’s how simple the “Kindle – remove highlights” process is when using your computer!
Part 3: Turn Off the “Popular Highlights” Feature on Android and iOS Devices
You might also wonder if you can accomplish the “Kindle – remove highlights” process on your mobile devices as well. Of course, you can do that! Here are the steps that you must do if you’re an Android or an iOS mobile device user.
On Android Mobile Devices
Step #1. Launch the Kindle app on your Android mobile device. At the bottom, right area, hit the “More” button, and then choose “Settings” next.
Step #2. Scroll until you see the “Popular Highlights” option. You will notice a checkbox next to it. This must be unchecked. After completing, this feature shall now be disabled on your Kindle app on Android!
On iOS Devices
Whether you are using an iPad or an iPhone, you may follow the below guide about the “Kindle – remove highlights” process.
Step #1. On your iOS device, start by opening the Kindle app. Head over to the bottom left area in order to see and press “Settings”. Scroll down and look to. This must be tapped next.
Step #2. You should see the “Popular Highlights” menu. It has a slider next to it. This me be toggled off to disable the “Popular Highlights” function on your Kindle app on your iOS device!
The “Popular Highlights” feature of Kindle was created to help those who would want to immediately identify the key passages or important points in e-books. For those who do not have much time to run through everything, this is indeed beneficial.
However, some users might find this disturbing. Fortunately, there’s a way of getting rid of or disabling it. Hopefully, the presented instructions are all clear to you and you may now do the procedure yourself when you don’t want to use this feature.
Part 4: Added Information for Audible Audiobooks Enthusiasts
Apart from being a Kindle user, does Audible also amaze you? Do you have Audible collections? If you are also an Audible enthusiast, this section of the article will be so much helpful to you!
Audible audiobooks are known to be protected with DRM encryption. Just like Apple Music, where people also spend time figuring out how to download songs after removing the DRM encryption. With this, the files can’t be accessed outside the app or on non-Audible-supported devices. The only way out is to remove this encryption. But how can one be able to do that?
Thankfully, there are various professional and trusted software like the TunesFun Audible Converter.
⭐ Aside from this major function, this tool can also offer other perks such as file conversion! It supports flexible and usual output formats like itM4A and FLAC.
⭐ Though audiobooks are usually long, one should not be bothered about the processing time as this app can perform at a rate of 60x.
⭐ Moreover, the original quality and the ID tags and metadata details of the files shall also be kept.
⭐ This app is supported by both Windows and Mac OS and has a UI that’s friendly enough even for first-time users!
⭐ The TunesFun team even makes sure that users will be getting the best experience that’s why they are continuously doing updates and upgrades on the app.
In case you’d like to check out and try the TunesFun Audible Converter, you may use the below guide.
Click to download and follow the step-by-step guide! It's 100% secure.
Try It Free Try It Free
Step #1. Open the TunesFun Audible Converter after installing it on your PC. Start adding the Audible files that you’d like to process.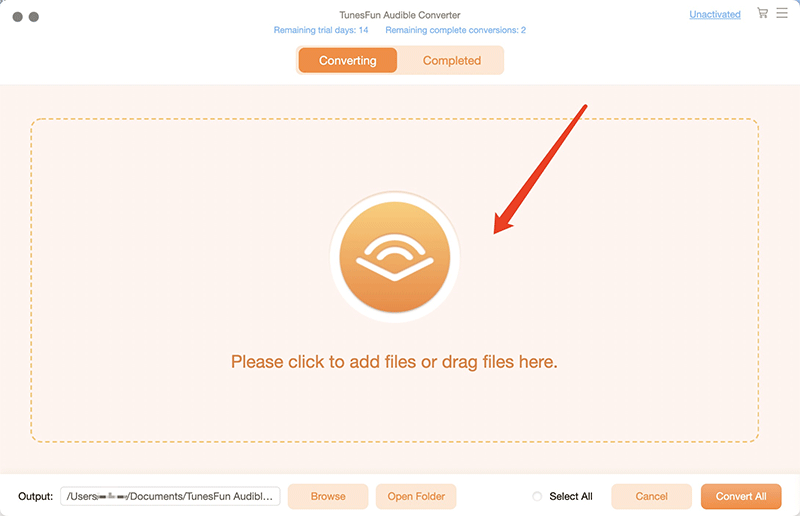
Step #2. From the available output formats, select the one you preferred the most. Also, the output folder location must be set up accordingly to easily access the output files after the process.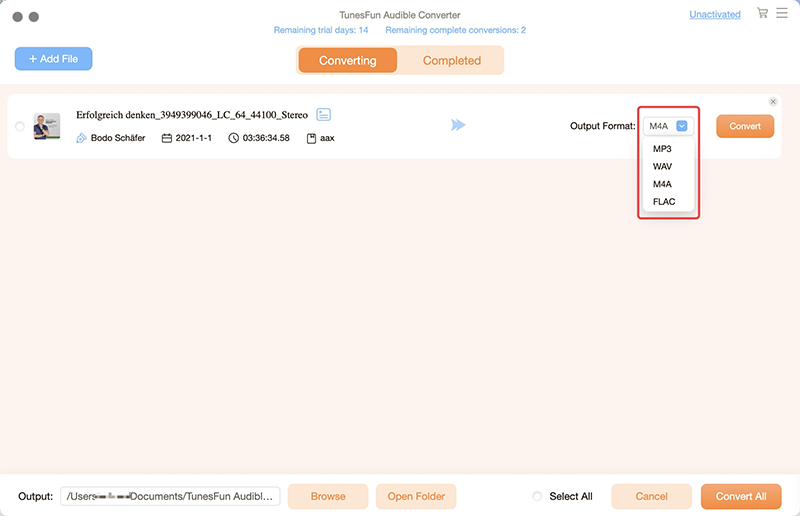
Step #3. Tapping the “Convert” button at the bottom of the page shall trigger the app to start the conversion procedure. The removal of the Audible files’ protection shall also happen at the same time.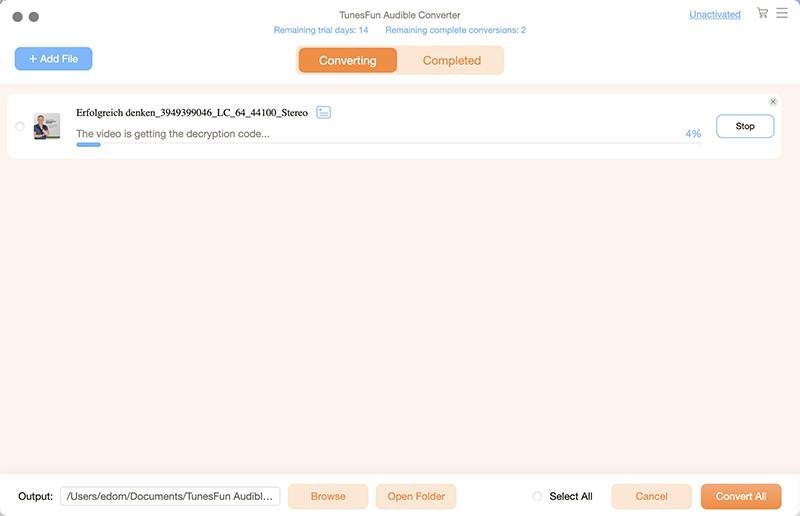
As easy as accomplishing the above, you’ll be able to get the DRM-free and converted Audible files saved on your PC. Those should be DRM-free already and can be saved on any device that you’d like to use!
Part 5: Summary
Thankfully, you can do the “Kindle – remove highlights” process on all devices that support the Kindle app. Having the ability to turn this feature off would be an advantage for those who don’t feel like using it. If you got caught up and don’t know what to do, you can always go back to the abovementioned procedures and follow them!
Also, in case you are an Audible fanatic as well, remember that apps like the TunesFun Audible Converter could be a companion when it comes to the conversion of your audiobooks!
 Home
Home
Leave a comment