How to Add Music to PowerPoint from Spotify in 2025
Indeed, many regards Microsoft PowerPoint as a great presentation software platform that can be used by students, professionals, businessmen, and others. This is so useful during corporate and business meetings, training and seminars, and the like.
When presenting, the main goal will always be to share the ideas and information needed by the audience. However, to keep the discussion and presentation somehow interesting and entertaining, many presenters usually find ways to spice up their PowerPoint presentations. One good way to do that is actually to use background music. However, how to add music to PowerPoint from Spotify?
If you are wondering how to add Spotify music to PowerPoint, you landed on the right page. This article will highlight on how to embed Spotify songs into PowerPoint presentation. If you are interested in what this post has, keep on reading it.
Also Read: How to Add Music to PowerPoint from YouTube [Best Guide]
Article Content Part 1. Can You Add Spotify Music to PowerPointPart 2. How to Add Free Music to PowerPoint [Simple Ways]Part 3. How to Download Spotify Music for Adding to PowerPointPart 4. How to Add Spotify Music to PowerPoint [Recommended]Part 5. Summary
Part 1. Can You Add Spotify Music to PowerPoint
Can you add Spotify music to PowerPoint directly? The answer is no. Adding audio to PowerPoint is a simple process, but it's not simple if you try to insert Spotify music into a PowerPoint presentation. Due to DRM protection and the streaming nature of Spotify, it's not simple to add Spotify music directly to a PowerPoint presentation. Spotify music is protected by DRM, which prevents unauthorized copying, distribution, and use outside the Spotify platform. And PowerPoint doesn't support streaming DRM-protected content directly from Spotify.
In addition, Spotify is a streaming service, which means you need an active Internet connection to play music. PowerPoint doesn't have built-in support for streaming services like Spotify, which makes integration complicated. PowerPoint usually supports local audio files, such as MP3, which can be embedded and played offline.
Although it's not possible to add Spotify music to a PowerPoint presentation directly due to DRM restrictions, you can use hyperlinks, convert the music to MP3, or use other streaming services. Next, let's take a look at the detailed steps of how to add music to PowerPoint from Spotify.
Part 2. How to Add Free Music to PowerPoint [Simple Ways]
Since our goal here is to share how to add music to PowerPoint, we will be giving you ideas on the easy methods of adding music to PowerPoint especially if you have available free music with you. A different discussion shall be presented later on for adding Spotify music to PowerPoint presentation. We’ve got 2 methods to highlight in this section of the article.
Uploading a Song from Your PC
If you have free music with you on your PC, the process of how to add music to PowerPoint is very easy to accomplish. You can just refer to the below guide. Before we begin, please note the following: in PowerPoint 2010 or older, you should use .wav or .wma files on Windows, and .wav files on Mac. If you’re using a newer version, we recommend that you work with AAC .M4A files.
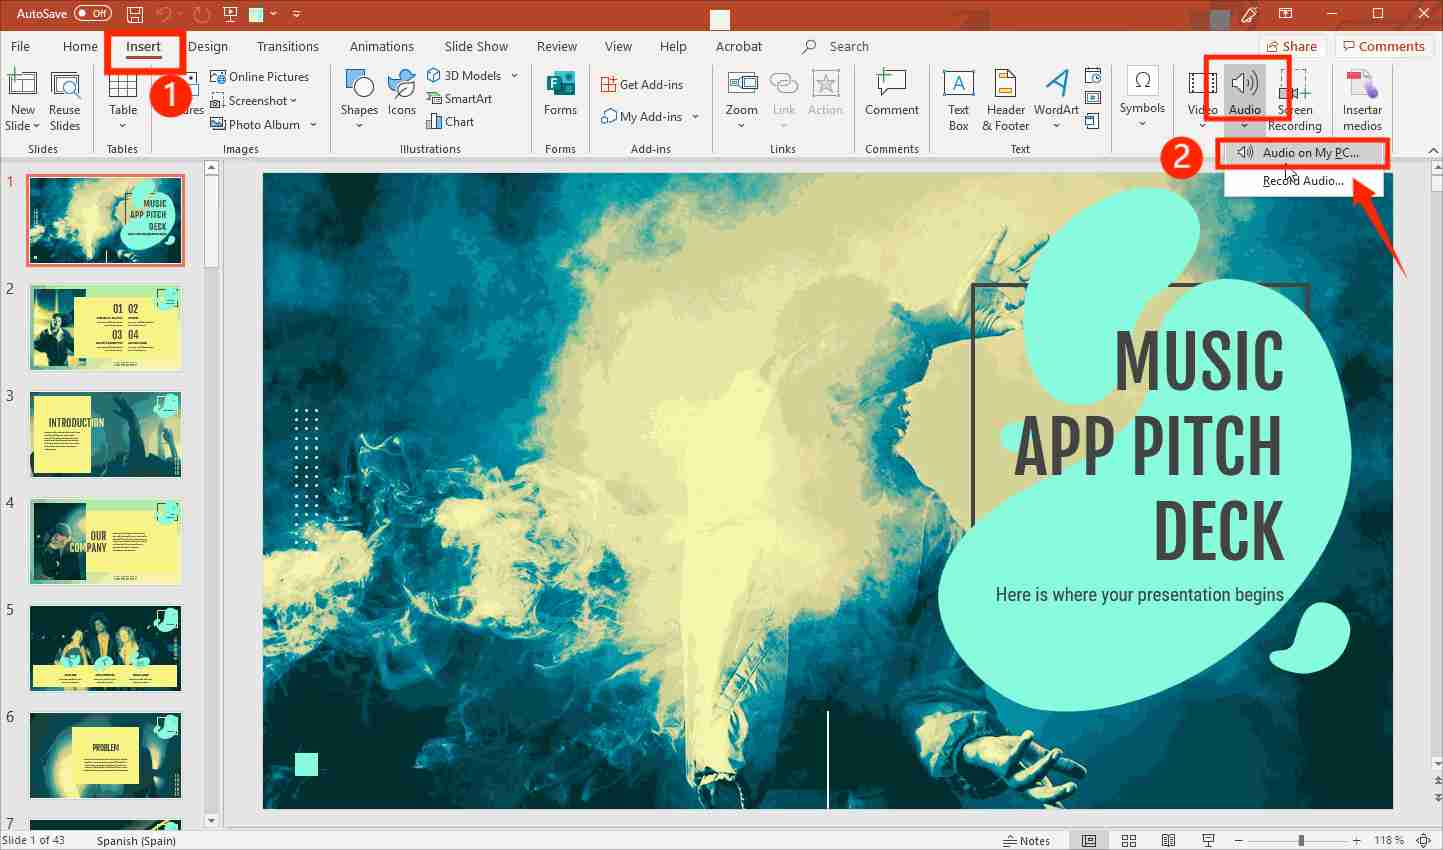
Step #1. Launch your PowerPoint presentation. Choose the slide where you would like to music to be added. Now, head to the “Insert” menu on the ribbon.
Step #2. Select the drop-down menu for “Audio” which should just be on the right part of the ribbon. If you have an audio saved in a local file, use the "Audio on My PC" option.
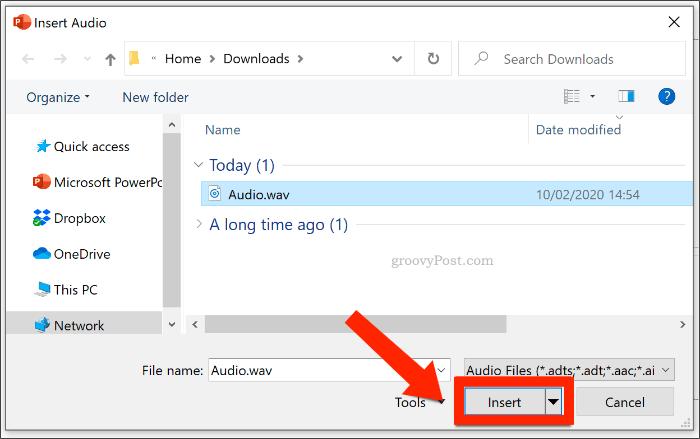
Step #3. A new window will open wherein you can select the music you’d like to use. Once selected, just tap the “Insert” button.
Step #4. You shall see an audio icon on the selected PowerPoint slide. You can now use the “Play” button if you wish to listen to the added audio. Adjusting the playback options can be done via the “Playback” tab.
Recording Music During Slideshow Creation
Another method of how to add music to PowerPoint is by recording music while creating the PowerPoint slideshow. If you feel like using your own voice or a certain source, you can use this recording method. Here are the steps to follow.
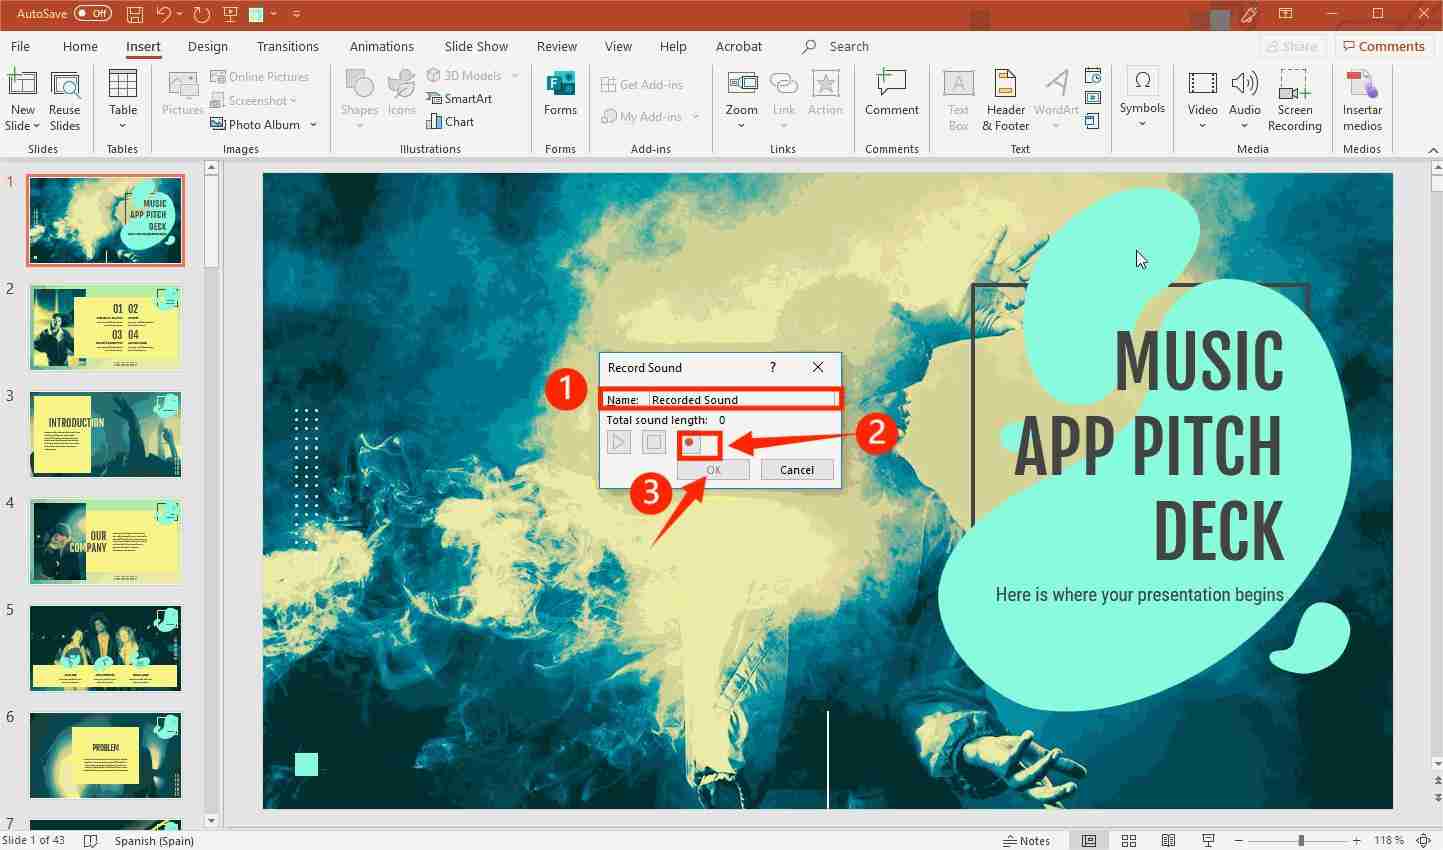
Step #1. Open your PowerPoint presentation and select a slide. Click on the Insert > Audio > Record Audio option on the ribbon. Ensure that your computer currently in use has a built-in microphone. If none, using an external device shall work. A record box shall appear on your screen. Enter the name of the audio file you’re about to record.
Step #2. Tap the “Record” button to start (the red circle). Once you’re done recording, just tap the “Stop” button (the square one). You may press the “Play” option in case you’d like to listen to it.
Step #3. Once you're satisfied, you just have to click the “OK” button and the “Audio” icon shall be displayed on the slide you selected in step one.
Apart from these two, there are actually a few more solutions to add music to PowerPoint. Since we are focusing on helping you with how to add music to PowerPoint from Spotify, the next parts will be about the discussion on this. Let’s move on and see what the next section has.
Part 3. How to Download Spotify Music for Adding to PowerPoint
Knowing the basic ways of how to add music to PowerPoint might not seem to be enough especially if you are looking at using songs that are new and trendy. Well, those can only be seen and downloaded from music streaming platforms like Spotify! Now, the dilemma here is how to add music to PowerPoint from Spotify. Unlike free music, Spotify tracks are protected files which makes it quite difficult to easily import them onto a PowerPoint presentation. The tracks are as well in OGG Vorbis format which can only be played via the Spotify app itself.
Though the above seemed to be bothersome, you don’t actually need to think that much when it comes to downloading Spotify songs that are to be used on your PowerPoint presentation. You should know that great and trusted apps like the TunesFun Spotify Music Converter can assist you with the easy DRM protection removal process!
In addition to the above ability, this TunesFun Spotify Music Converter can even help you convert Spotify songs to common formats like MP3. Thus, helping you avoid any flexibility or compatibility issues! So you can not only add music to PowerPoint, but you can also add Spotify music to Instagram Story, or other video editing applications to make your video fun.
This even makes the conversion lossless so you can be assured that the 100% original quality, ID tags, and metadata information of the songs will all be kept. This works fast enough helping you ensure that you can even save time! It is fascinating to also know that it does batch conversion. Click the below button to try it for free now!
How to download Spotify songs via the TunesFun Spotify Music Converter:
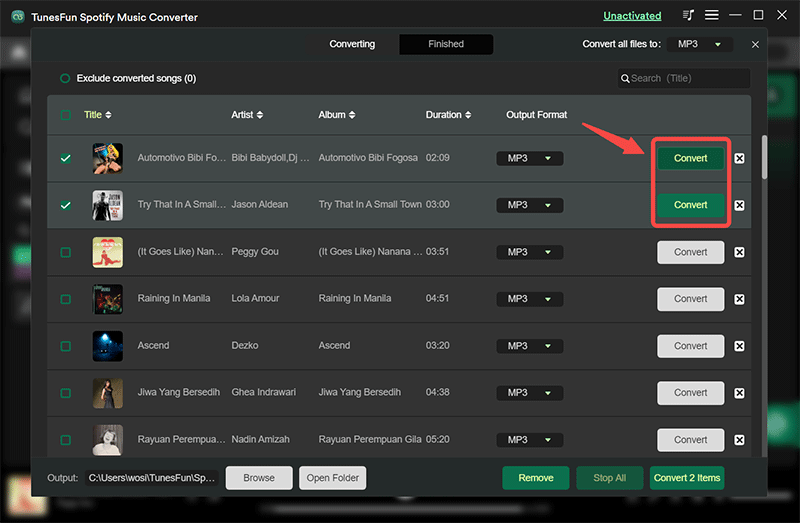
Step #1. Once all the installation needs of this app have been met, launch it. On the main page, you shall see the option to add the Spotify songs to be processed – use URLs. Alternatively, you can just drag and drop the tracks for an easy uploading process. Again, batch conversion is supported so if you are looking at processing a bunch of Spotify songs, that should work!
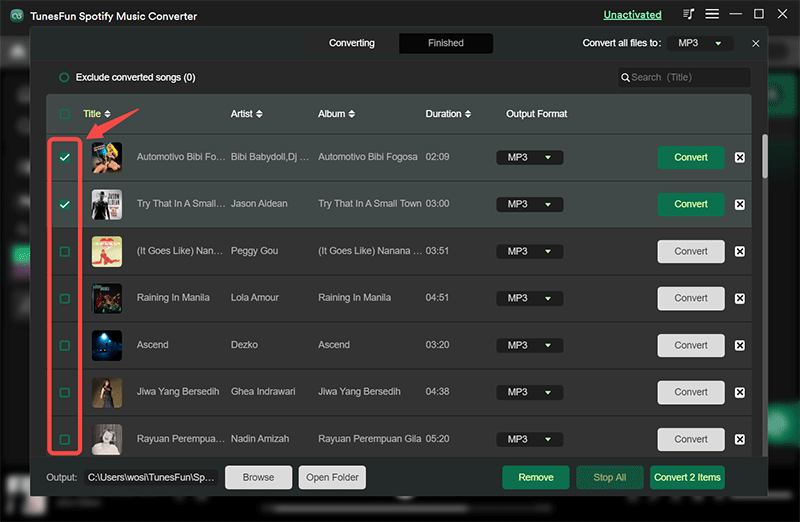
Step #2. Choose an output format you desire to use and modify the other remaining output parameters as you like.

Step #3. Once you are done with step 2, you may now tap either the “Convert” or the “Convert All” button. This will let the app start converting the uploaded Spotify songs. At the same time, the DRM removal procedure shall also be done by the app.
Once the conversion is over, you can also get to see a glimpse of the processed files by clicking the “View Output File” menu. Rest assured that the outputs saved on your PC are already free from DRM and are converted.
Part 4. How to Add Spotify Music to PowerPoint [Recommended]
Now that we have just downloaded Spotify songs and have ensured that they are DRM-free, we can finally finish off the “how to add music to PowerPoint from Spotify” process now. We’ll teach you how to add Spotify music to PowerPoint presentations on Mac or Windows computers.
How to Add Spotify Music to PowerPoint on Mac
Step #1. Open the existing PowerPoint presentation that you’d like to use or just create one if you don’t have one yet.
Step #2. Choose a slide to work on and tap the “Insert” tab. Afterward, select the “Audio” option next.
Step #3. To see the audio files from iTunes, tap the “Audio Browser” menu. Alternatively, you can add the converted Spotify songs that you have by ticking off the “Audio from File” option.
Step #4. Just select the transformed Spotify song that you wish to use. Click “Insert” to finally use and add it as background music.
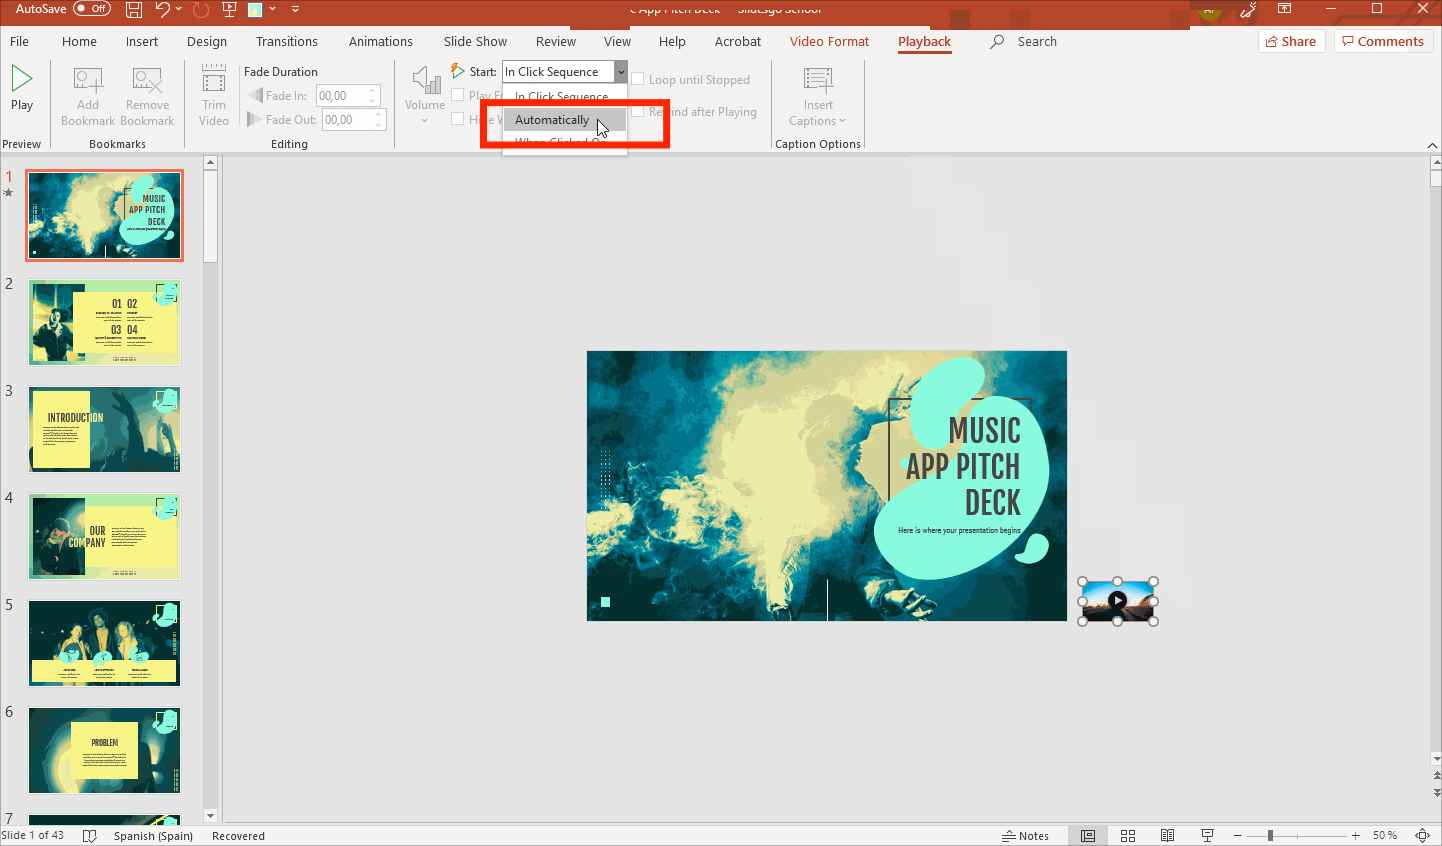
Step #5. Tap “Start”, then on the “Video Options” tab, choose “Automatically”. This way, once the chosen slide appears, the track added shall play automatically.
How to Add Spotify Music to PowerPoint on Windows
Step #1. Open PowerPoint and start by creating a blank slide. Or, if you have an existing file, just launch it and select the slide where the converted Spotify song will be added.
Step #2. Tap the “Insert” option above, select “Audio”, and then choose the “Audio on My PC” option. A “Browse” window shall appear.
Step #3. Look for the folder where the converted Spotify songs were saved and just select the track you wish to use. Tap the “Insert” button once you’re done choosing.
Step #4. The “Play in Background” option must be tapped. This will ensure that the audio will start playing automatically when the slideshow has been opened.
Part 5. Summary
The process of how to add music to PowerPoint is totally easy to do. If you have free music files with you or even if you wish to use protected files like those from music streaming platforms such as Spotify, you should not have any issues at all! Remember that when dealing with Spotify music downloading, always use the best tools such as this TunesFun Spotify Music Converter!
 Home
Home
Leave a comment