Cancel Google Play Music Upload: Guideline and Procedures
Google Play Music is a streaming service by Google, there are many things that we have to know to cancel Google Play Music upload. Google Play Music, is similar to music streaming sites that we often encounter such as Spotify, Pandora, Apple Music, Deezer, and many others.
Each of the music platforms that we have mentioned has its own libraries and genres to offer, and if we are going to go ask around for the best ones, Google Play Music will definitely have its place.
There are about 35 million songs that you can access in Google Play Music, and it even lets you upload your own music, and make your own playlists as well.
With Google Play Music, you can store up to 50,000 songs, and the best thing about these songs is they are ad-free. Google Play Music is also free, however, it is limited to artist radios, limited skips, and ads as well.
We may know the procedures of how to add music to Google Slides, so in this article, we are going to discuss things to know about Google Play Music and the procedures on how to cancel Google Play Music upload as well. So, if you are interested in figuring these things out, let us start the discussion below.
Article Content Part. 1. How to Cancel Google Play Music through Your Android App?Part 2. How to Cancel Google Play Music Upload on A Computer?Part 3. What is the Most Convenient Way to Stream and Download All the Music Tracks That We Love from Apple Music?Part 4. To Summarize It All
Part. 1. How to Cancel Google Play Music through Your Android App?
Since we are about to talk how to cancel Google Play Music upload, we have to figure out about how to cancel the Google Play Music through your Android app, in order to do it. Once Google Play Music is turned off or canceled, then the uploading of music will follow as well.
Step 1. To begin, we need to open the Google Play Music app. The only mobile device that you can use in order to cancel the Google Play Music subscription is an Android device.
Step 2. On the upper left part of the screen, tap the three horizontal lines or the menu icon.
Step 3. Then you have to scroll down the menu, and then tap the Settings icon.
Step 4. Tap the Cancel Subscription option.
Step 5. Choose a reason why are you going to cancel your Google Play Music subscription, and then tap the Continue tab.
Step 6. Choose the Manage Subscription option, and then tap the Cancel Subscription option.
Step 7. To finish the cancellation, tap the option Cancel Subscription once again, and then you will see a pop-up, you will then be able to view the exact date that your subscription to Google Play Music will be canceled. Then you must receive an email as confirmation.
Part 2. How to Cancel Google Play Music Upload on A Computer?
Now we are going to discuss how to cancel Google Play Music upload on a computer. This time, we need to use a browser in order to proceed with the cancellation of the Google Play Music subscription. Let us take a look at how can we do it, below.

Step 1. On your computer, you can open your browser, and then go to the official website of Google Play Music.
Step 2. At the right part of the screen, you will see a gear icon, tap it since it is the Settings icon.
Step 3. Once you tap the Settings icon, you will see its menu. Then on the drop-down menu choose the My Account option.
Step 4. You need to scroll down in order to view the Order History. You have to scroll until you are able to find the Google Music subscription, you will see the three dots to the right, tap it.
Step 5. Choose the Cancel Subscription option.
Step6. You will see a pop-up menu, then you have to tap the Cancel Subscription once more.
Step 7. You will then receive a confirmation email, which notifies you of the last day that you can finally use your Google Play Music subscription and as long as it is within the covered billing period.
Those are the procedures on how to cancel Google Play Music subscription, and by doing so, you are technically learning how to cancel Google Play Music upload.
Now, let us talk about a tool that we can use in order to access endless music that we want without encountering lots of hassles and in return will make our music experience the best one ever we had.
Part 3. What is the Most Convenient Way to Stream and Download All the Music Tracks That We Love from Apple Music?
Now that we have ideas about how to cancel Google Play Music upload with the steps that we have discussed above, let us now talk about a way where we can access music files in Apple Music more conveniently.
As we all know there are limitations when it comes to accessing Apple Music. Aside from getting a subscription to Apple Music, it is also a must that you secure an Apple-authorized device that you can use to play and download Apple Music tracks.
One of the biggest hurdles that you have to overcome is the DRM encryption that protects Apple Music tracks from being illegally copied, shared, and downloaded. And of course, in case you do not have a subscription but you have an account, you need to find a place where the internet connection is really stable.
In case you are having some difficulties dealing with all the conditions that we have mentioned, we have a tool that can help you, you can use the TunesFun Apple Music Converter.
This is a professional converter, which can make modifications on your music tracks so accessibility will be easier than you have ever thought before.
Once you have used the TunesFun Apple Music Converter to convert your Apple Music tracks, the dilemmas when it comes to device and format incompatibilities will be surely solved. And you can also definitely save a lot of your time since the tool is able to convert at a faster conversion rate.
And even with the fast-paced conversion, the output files are really amazing! They are really of good quality and you cannot even compare the original files to the converted ones.
With its simple interface conversions can also be easily taken care of, and to give you a guide of things that you have to do, you have to see the steps that we have below.
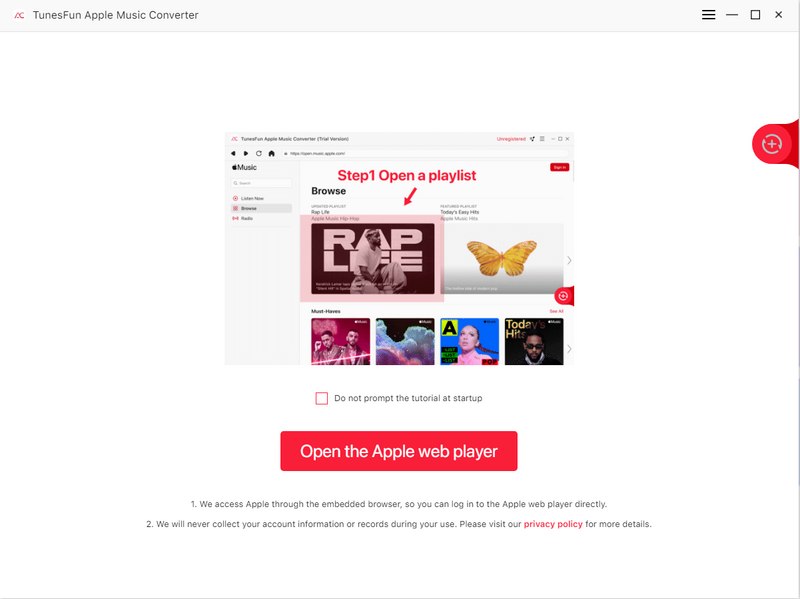
Step 1. The TunesFun Apple Music Converter should be installed on the computer that you will be using. Then launch the tool to finally import the music files that you need to convert. You can drag and drop the files, copy the URLs of the files, or tap the Add files to start the conversion process.
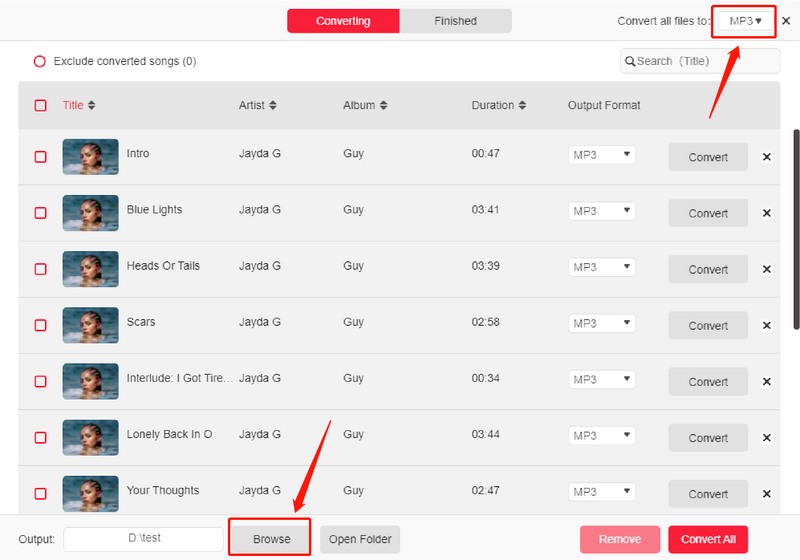
Step 2. Choose your file type based on what the TunesFun Apple Music Converter offers. Make a folder where you are going to save your converted Apple Music files. You can rename the folder based on your own preferences, or you can use default information like the name of the album, artists, or titles of the songs.
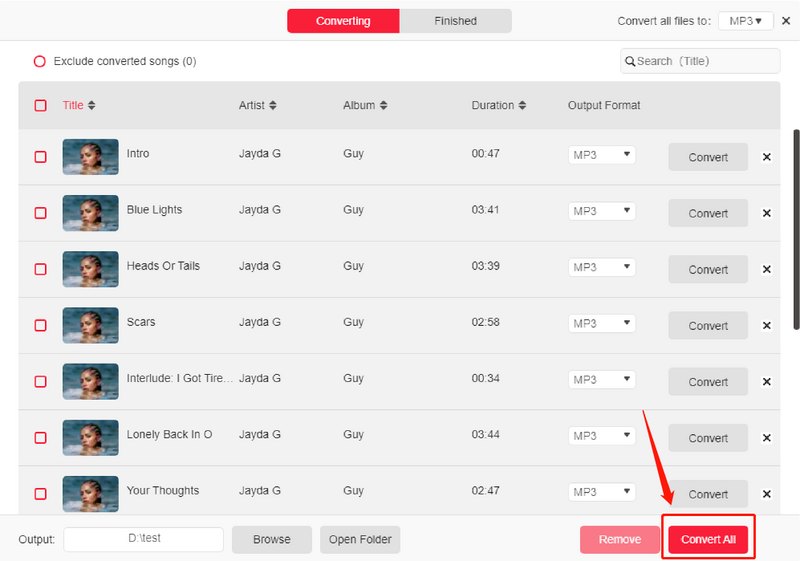
Step 3. Tap the Convert tab and in just a few minutes you will see the output brought to you by the TunesFun Apple Music Converter. You can also oversee the conversion process on the home page of the professional tool.
And that is how you can use the TunesFun Apple Music Converter, you can do whatever you like, and get all the music files that you need to convert anytime you want, or anywhere you go.
The TunesFun Apple Music Converter will make sure that you get to listen to all the songs that you would like from Apple Music without any hassle, or problems in terms of format and device compatibility.
Part 4. To Summarize It All
And that is how you cancel Google Play Music upload, you can technically cancel your subscription first, and then the cancellation of the upload comes next. We have shared all the needed procedures that you have to follow, and you can go with them one by one in order to see the results or the outcomes.
Overall, we suggest that when it comes to looking for the best way to go over your music fantasies with the Apple Music app, you look for third-party applications that are really reliable and efficient.
One of them is the TunesFun Apple Music Converter, a tool made for you to enjoy the conversion process while making sure that you will be able to listen to all the songs that you desire from Apple Music in the fastest, most efficient, and most fun file conversion experience ever.
We recommend that you try this very amazing tool, and see for yourself the best results you deserve.
 Home
Home
Leave a comment