The Easiest Way To Export iTunes Playlists To MP3
Are you also trying to find out more about the process of how to export iTunes playlists to MP3 format? Surely, you are also thinking about why most people just love having their files in MP3 format. Well, MP3 is indeed very popular. MP3 files are easy to play and access, as well as being compatible with almost all devices and media players. More so, you can have them ripped to CDs.
When it comes to trying to export an iTunes playlist to MP3, it can easily be done if you are to process unprotected files. However, the case will be different if you wish to export or transform iTunes songs that are protected under Apple’s FairPlay Protection Policy. Don’t worry, we will be discussing how both the protected and unprotected files can be handled in this article.
Article Content Part 1. How To Export iTunes Playlist To MP3?Part 2. How To Export DRM-Protected iTunes Playlist To MP3?Part 3. Summary
Part 1. How To Export iTunes Playlist To MP3?
Again, it is easy to export iTunes playlists to MP3 format if the files involved are unprotected. With this note, you can just use either your Apple Music app or the iTunes app itself. We will be sharing the detailed steps in the next paragraphs.

Steps to Export iTunes Playlists Using the iTunes App on Windows PC
If you are a Windows PC user, it will be easy for you to export iTunes playlists to MP3 format using the iTunes app itself. These are the steps you need to follow.
Step #1. On your Windows PC, launch the iTunes app.
Step #2. Head to the “Edit” tab and then from the options shown, click the “Preferences” button.
Step #3. You need to tick the “General” option, then the “Import Settings” button.
Step #4. A window will popup for “Import Using”. This is where you will choose “MP3 Encoder” for you to finally export iTunes playlists to MP3 format. All changes would be saved once the “OK” button has been clicked.
Step #5. Head back to your library to select the songs you like to export to MP3 format.
Step #6. After the selection process, tap the “File” button, then the “Convert” option next.
Step #7. Another set of options will be displayed. From those, ensure to choose the “Create MP3 Version” option.
Steps to Export iTunes Playlists Using the Apple Music App on Mac PC
Apart from using the iTunes app, your Apple Music app is as well beneficial. Through it, you can easily export iTunes playlists to MP3 format. Here are the few steps that you have to complete.
Step #1. On your Mac computer, open the “Apple Music” app.
Step #2. On the main interface, you will see the “Music” option. Click on it and then tap the “Preferences” button next.
Step #3. Search for the “Files” tab and then select it. Choose “Import Settings” next.
Step #4. In the “Import Settings” menu, there is a button you need to select to choose the MP3 format.
Step #5. Tick the menu then choose MP3. Tap the “OK” button next.
Step #6. On your library, select the songs to be processed and to be converted to MP3 format.
Step #7. Click the “File” tab next and then choose the “Convert” button. A popup menu will be displayed wherein you will need to choose the “Create MP3 Version” option.
The MP3 versions of the iTunes songs will be in the library alongside the original ones. As simple as that, you can export iTunes playlists to MP3 format!
Part 2. How To Export DRM-Protected iTunes Playlist To MP3?
Now, as we have stated, the use of iTunes and the Apple Music app will only work if you are to convert songs that are unprotected. If you have protected iTunes songs, the best way to deal with them is to use a professional app like this TunesFun Apple Music Converter.

Apart from the ability to remove the DRM protection of the songs, the TunesFun Apple Music Converter is also capable of exporting iTunes playlists to MP3 format for free. More so, it can help you to export the iTunes playlist with many other formats of music files, including FLAC, WAV, M4A, and more.
TunesFun Apple Music Converter works at a very fast speed. Thus, you can ensure that the whole process will be completed within just a few minutes. It also has a simple and clear interface, so you can get your MP3 music file much easier.
For your reference, here is how you can export iTunes playlists to MP3 format using the TunesFun Apple Music Converter.
Step #1. After installing the app on your Windows or Mac PC, launch it right away and then start selecting or previewing the songs to be converted.
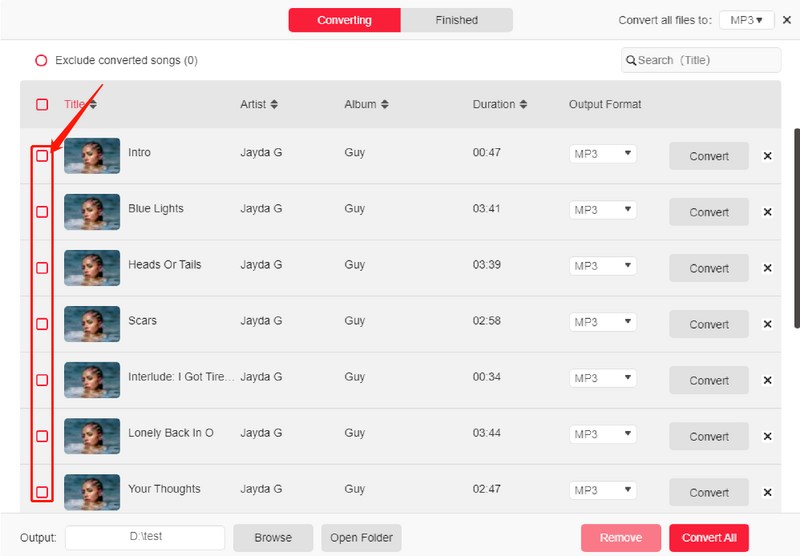
Step #2. Once the iTunes or Apple Music songs are imported, you can now set up the output profile settings. Of course, the output format needs to be set up as MP3. The output path is as well important for you to access the converted files easily after the conversion process is over.
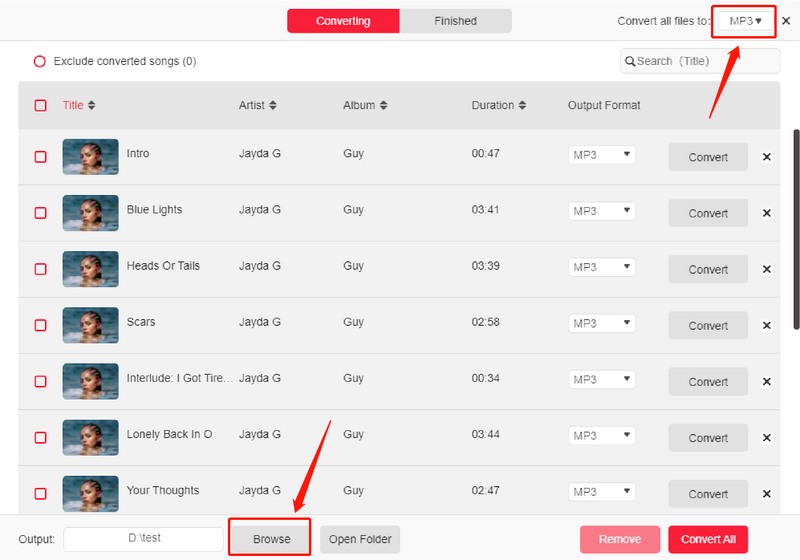
Step #3. Tap the “Convert” button to finally export iTunes playlists to MP3. The DRM removal procedure will also be done by the app.
In just a few minutes, you can have the MP3 files ready in the output folder defined in step 2!
Part 3. Summary
To export iTunes playlists to MP3, you can use both the iTunes and the Apple Music app. However, this will only work if you are to process the unprotected ones. Now, if you have protected iTunes files, the best way to do the conversion would be through an app like this TunesFun Apple Music Converter!
 Home
Home
Leave a comment