How To Transfer Music From iTunes To USB Flash Drive On A Mac?
Most people, not only music enthusiasts, are very lucky to have known about the iTunes application. The mentioned app is indeed a benefit for users because it does function both as a media player and a file manager that can handle different media content including music or audio files, videos, TV shows, and more. If you have been using iTunes to store specifically your iTunes music files, we bet you will be interested in knowing how to transfer music from iTunes to USB flash drive on a Mac.
When you try to switch from one device to another, instead of experiencing the hassle of syncing the music files your library has, it will always be better to just have them saved on an external drive and copy the files from it. Well, we bet you’ll surely agree to this. If you are an avid user of Mac, getting to know every detail about this “how to transfer music from iTunes to USB flash drive on a Mac” topic will be helpful to you in some way.
You are lucky. Each part of this article will expose a certain method of transferring music from iTunes to USB flash drive on a Mac. Make sure you read each section thoroughly to learn the information and procedures that you have to know relative to this topic.
Article Content Part 1. How to Transfer Music from iTunes to USB Drive Directly?Part 2. Copy iTunes Music from Stored Folder to USB or Flash Drive DirectlyPart 3. Transfer Music from iTunes to USB/Flash Drive with iTunes TransferPart 4. Convert Apple Music/iTunes Music to MP3 and Transfer to USB DrivePart 5. Summary
Part 1. How to Transfer Music from iTunes to USB Drive Directly?
If you have been using the iTunes app to manage and store your media files, you are perhaps utilizing its capability which is a good thing and an advantage for you. You must then know that the music files that you currently have in your iTunes library can be transferred directly to a USB drive. However, keep in mind that if you have Apple Music songs in your library, moving them to an external drive like a USB won’t work. You can only move those that are not encrypted with DRM protection, the non-copyrighted ones.
If you are eyeing to move or transfer those DRM-free iTunes music files, you can follow the below procedure of how to transfer music from iTunes to USB flash drive on a Mac.
Step #1. Open the iTunes app on your Mac PC and then find those tracks that you like to save on your USB flash drive.
Step #2. Make sure that you have plugged the USB flash drive successfully onto your Mac PC’s USB port. Once this has been recognized by your Mac computer, just open the folder that you like the songs to be saved to. Or, you can create a new folder as you wish.
Step #3. Head back to your iTunes library and then drag and drop the iTunes songs that you like to save on your USB flash drive.
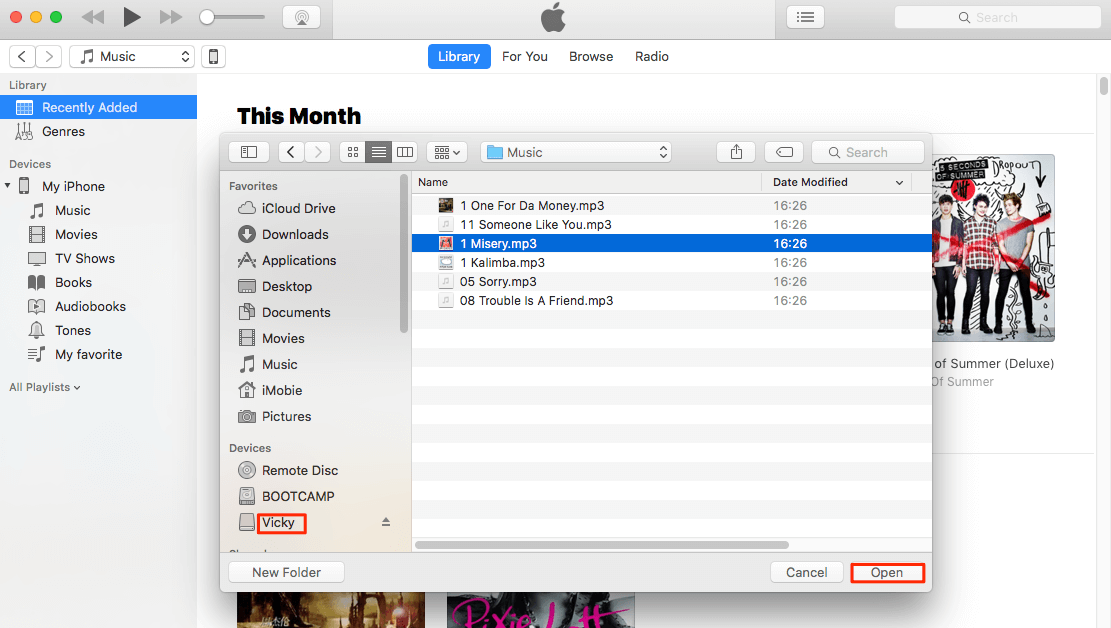
By following the above three-step procedure, you are already doing one method of how to transfer music from iTunes to USB flash drive on a Mac. But again, you have to remember that the above will only work if you are processing non-copyrighted iTunes music files.
Part 2. Copy iTunes Music from Stored Folder to USB or Flash Drive Directly
You just learned a method of how to transfer music from iTunes to USB flash drive on a Mac PC from the first part. In this second part, we will be sharing another. You can also copy iTunes music files from the stored folder to your USB flash drive with ease. All you have to do is just find where that stored folder is and drag and drop the tracks from there to your USB drive.
But the question here is how you can see where that stored folder is. Well, nothing to worry about. We’ll share every information you need relating to this method of how to transfer music from iTunes to USB flash drive on a Mac. Here is the procedure:
Step #1. On your Mac PC, open the iTunes app and start looking for the tracks that you like to transfer or move.
Step #2. Upon finding the songs, you can highlight them and then right-click on them. Options will be displayed. From those, choose the “Song Info” button.
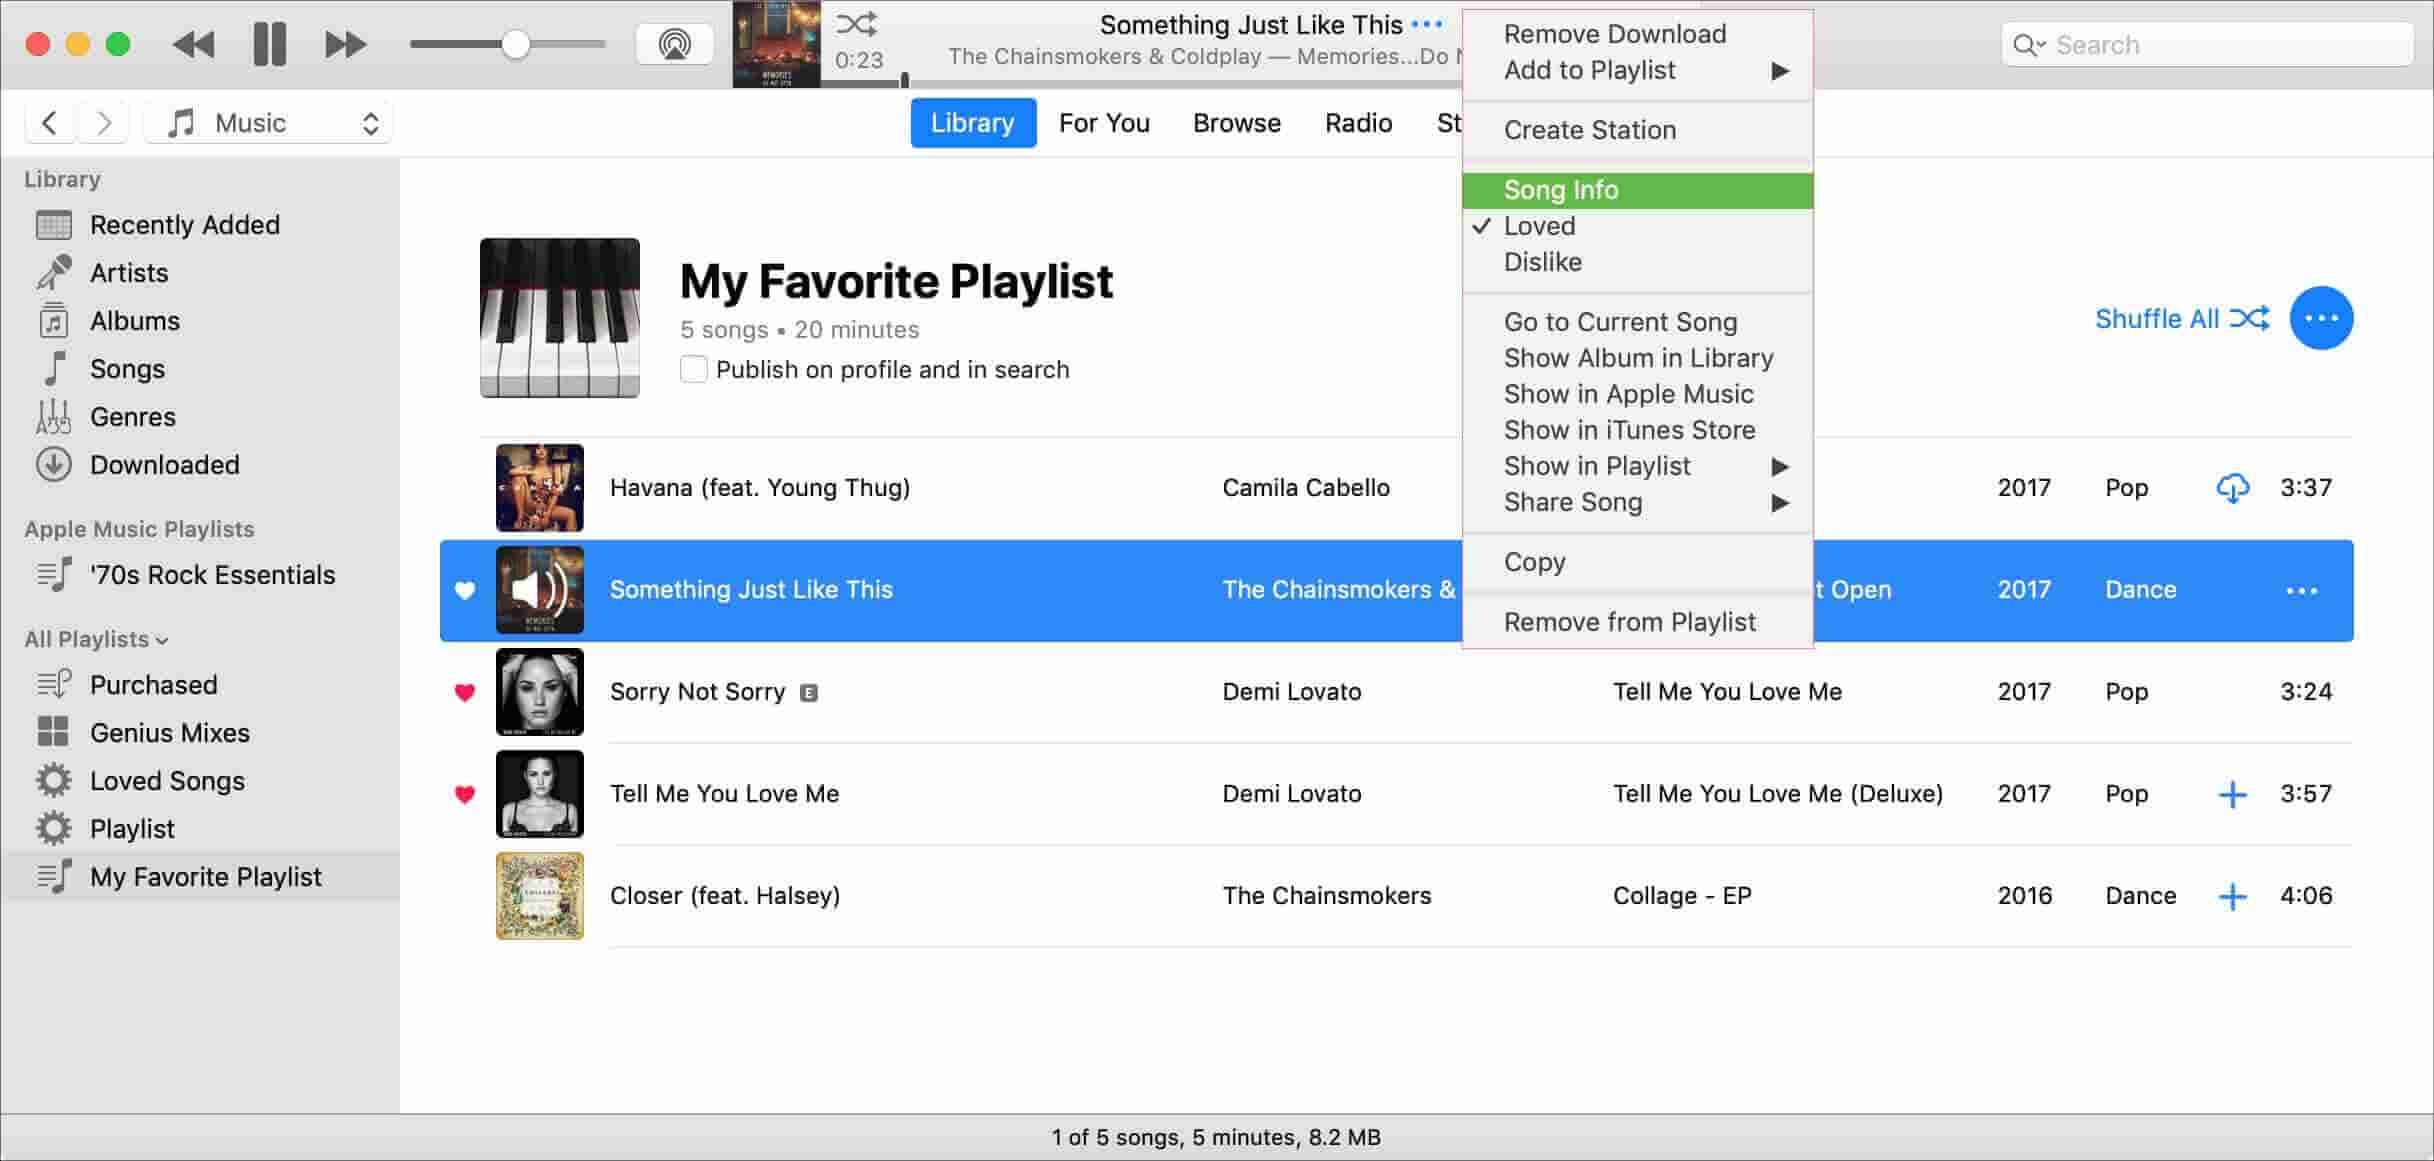
Step #3. Under the information windows, there is a “File” menu. Tick this button for you to see the “location” item.
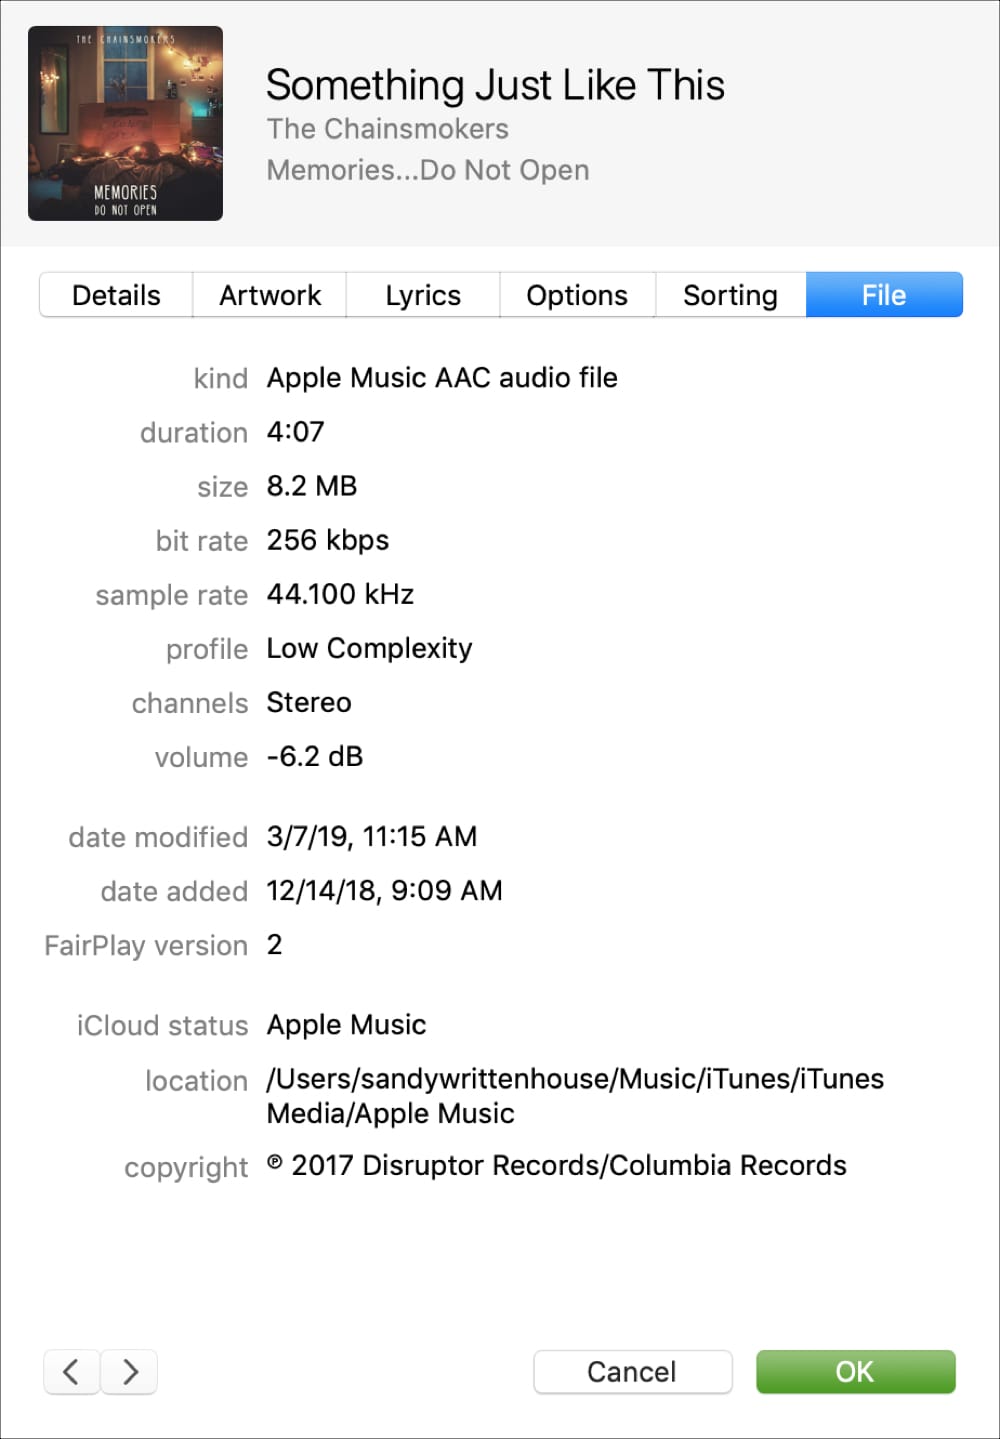
Step #4. You will get to see the storage path of the song leading you to the folder. All you have to do now is to copy the music files from that folder or just drag them to your USB flash drive’s folder.
An important note:
If you are looking for Apple Music songs, they are usually stored in this folder - C:\Users\[your computer name]\Music\iTunes\iTunes Media\Apple Music. However, you have to remember that these are encrypted files hindering you from moving, modifying, and accessing them on an unauthorized device or media player. If you wish to continue doing so, the encryption they have must be removed first. If you are curious to find out if there is a possibility of doing so, jumping to part 4 will be helpful!
Part 3. Transfer Music from iTunes to USB/Flash Drive with iTunes Transfer
As we have promised, we will be sharing bunches of methods of transferring music from iTunes to USB flash drive on a Mac in this article. Thus, we’ve got here another. This method of how to transfer music from iTunes to USB flash drive on a Mac is through the help of “iTunes Transfer”.
Have you heard or read about this “iTunes Transfer” before? If you haven’t yet, you must then know how good this app is. It is actually a tool that helps in moving media files between iDevice users, PC users, hard drives owners, and iTunes app without worrying about data loss. Indeed, this “iTunes Transfer” is a good way of transferring music files from your iTunes library going to your iOS device like an iPhone, then having those exported to your PC, and eventually to your USB flash drive directly.
To help you further explain the whole process of how to transfer music from iTunes to USB flash drive on a Mac with iTunes Transfer, we have this section divided into two parts. Let’s begin with the first one.
Section #1. Move the iTunes Songs to your iPhone Device
You have to move the iTunes songs first to your iPhone device. Here are the steps that you have to follow.
Step #1. The iTunes Transfer app must be downloaded on your Mac PC first. Ensure that your iPhone has been connected to your Mac as well. Launch the iTunes Transfer app, and right away, click the “Transfer iTunes Media to Device” icon.
Step #2. The good thing with iTunes Transfer is that it can detect the media files from your library automatically. A pop-up window will appear displaying the list. The entire library will be checked by default. If you don’t like an item to be included in your list for transfer, just uncheck it.
Step #3. Tick off “Transfer” button. The checked items will then be moved to your iPhone. Just tap the “OK” button to complete the process.
You might be worried about duplicated songs. You don’t have to think about it. This app can also detect duplicated songs automatically. Thus, you can be assured that only a single item for a specific song will be moved.
Section #2. Move the iTunes Songs from your iPhone to the USB Drive You are Using
Now that we just discussed the first section, we will now be heading to the next to finally finish off the process of how to transfer music from iTunes to USB flash drive on a Mac PC.
Step #1. Run the iTunes Transfer app. Both your iPhone and USB flash drive must be connected to your Mac computer.
Step #2. Tick the “Music” option that you will see at the top section of your screen. Start selecting the music files to be transferred. Once done with this, tap the “Export” button, then the “Export to PC” menu, “Choose your flash drive”, and lastly, the “Click Select Folder” option.
Finally, once the above has been completed, all the selected iTunes songs will be available on your USB flash drive. Now, you can access those tracks from your USB drive on any media player or device that you like to use.
Part 4. Convert Apple Music/iTunes Music to MP3 and Transfer to USB Drive
We have initially mentioned in the above that Apple Music songs are protected files. If you wish to move or transfer them to other devices, access on any media player, or be saved on any storage devices like USBs or online clouds, the protection they have must be removed first. How to transfer music from iTunes to USB flash drive on a Mac with a fast and easy way?
It could be tricky at first for some users to deal with this DRM protection removal especially if they aren’t aware of this. To get right away into solving the limitations with the transferring or moving of the files, we’ll introduce you to this TunesFun Apple Music Converter.
This TunesFun Apple Music Converter is very capable of helping you with the easy process of how to transfer music from iTunes to USB flash drive on a Mac PC as it is fully capable of removing the DRM protection. More so, you can use the app to convert the files to flexible formats like MP3, FLAC, AAC, and more. This works 16x faster compared to other professional converters while preserving the ID3 tags of the songs as well as their original quality.
This app was also designed to have an interface that’s manageable enough to let even beginners and first time users easily handle it. Of course, we have here the detailed method of how you can use the TunesFun Apple Music Converter to convert the protected Apple Music and iTunes songs you have and finally be able to download apple music on your Mac.
Step #1. Download the app and install it on your Mac computer. Launch it right away and start previewing or selecting the songs to be converted. You can choose a bunch of songs if you wish to.
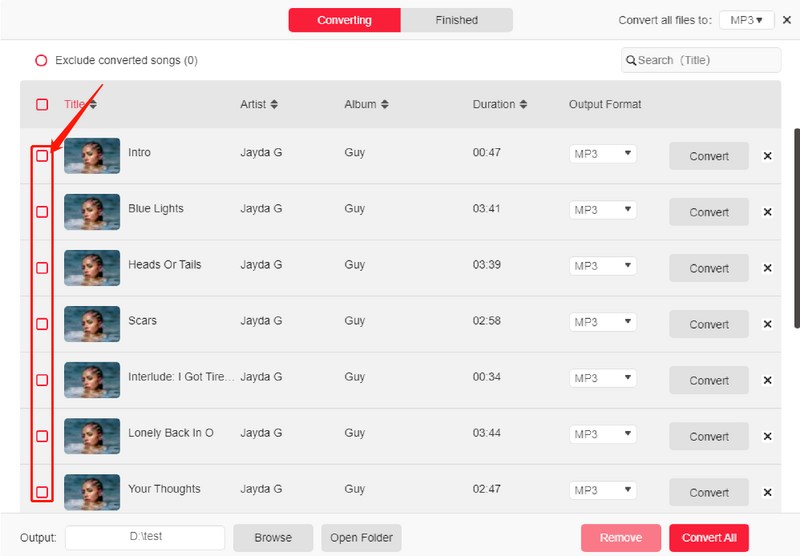
Step #2. Setup the output parameter. The output format, output path, and other output profile settings can be modified as you like.
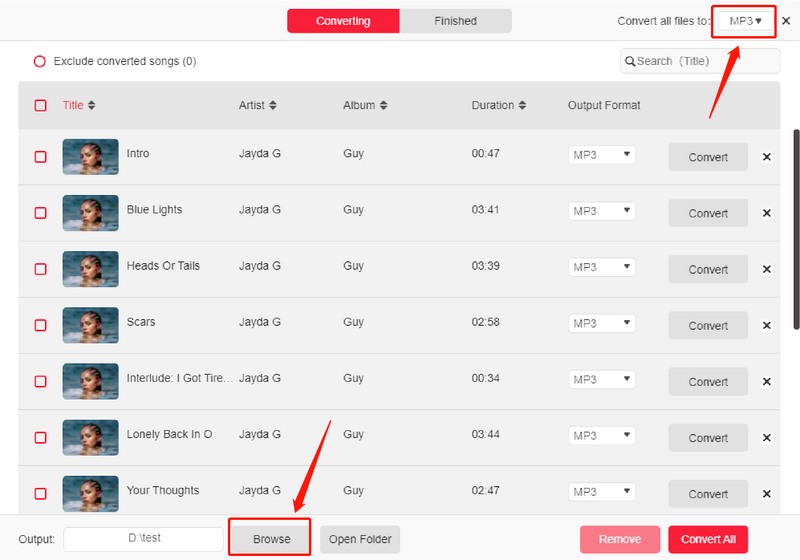
Step #3. Tapping the “Convert” button at the bottom of the page will trigger the app to do the transformation of the songs. Also, the DRM removal process will be done by the app simultaneously.
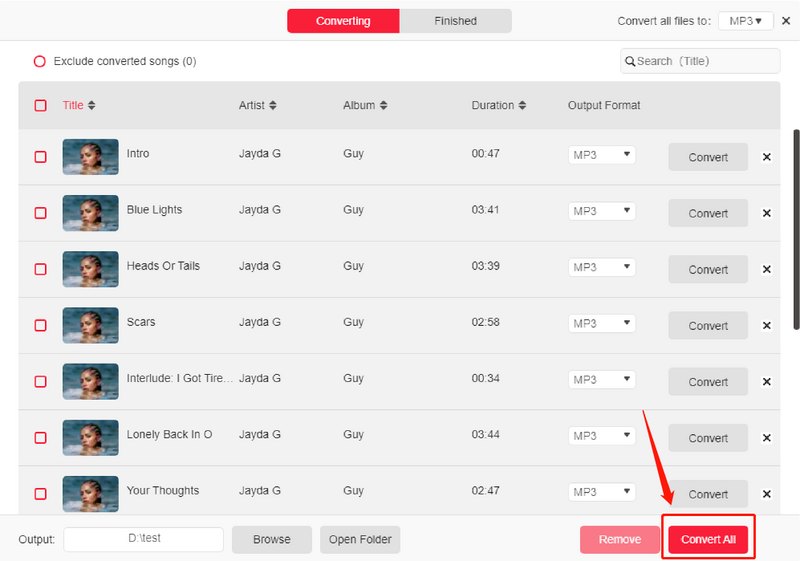
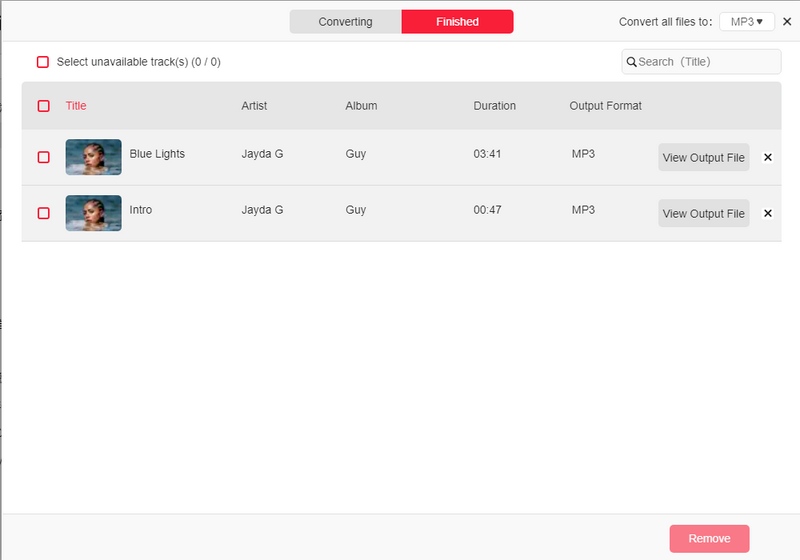
As we have mentioned, once the conversion is over, the output files will be DRM-free and so, you can have them saved on your USB flash drive! This, indeed, is a great method of how to transfer music from iTunes to USB flash drive on a Mac PC.
Part 5. Summary
You just have learned three easy methods of how to transfer music from iTunes to USB flash drive on a Mac PC from this post. Moving DRM-free iTunes and Apple Music songs is easy because there are no limitations present. But there is nothing to worry about if you have protected files, apps like the TunesFun Apple Music Converter can handle the issues for you.
 Home
Home
Leave a comment